With routine care your garden tools can last for years. It starts with good quality tools, of course, but regular cleaning, lubricating, and sharpening extends their life, saving both time and money.
Confused by pruners? This shows you how to decide which pruner is best for the jobs in your garden.

Making Garden Tools Last a Lifetime

No two gardeners prefer the same tools: it depends on what you’re growing, how you like to work, and the type of maintenance your garden requires.
But there’s one thing we all come to realize: cheap garden tools are cheap garden tools. More often than not, you get what you paid for.
Once you know which tools you like, start investing in the best ones you can afford and take the time to keep them in good shape. You’ll not only save a lot of money but have a collection of treasured tools to rely on throughout your gardening years.
Years ago I realized my tools would not last unless I made time to properly care for them. This means stopping early after a long day in the garden to get everything clean, sorted, and put back in its place.
It’s a routine that pays off and leaves everything in good order for the next day of garden work.
Related: See my DIY Garden Tool Shed
4 Tips For Best Garden Tool Care
1Make Them Stand Out
Brands like Fiskars have bright orange markings which make them highly visible in the garden, but some brands and older tools do not. If they are good tools, it’s easy to make them more noticeable with paint or tape.
- Paint the ends of the tool handles so they stand out in the garden.
- Or, mark them with a distinctive color of duct tape.
We all misplace garden tools now and then—sometimes finding them in the compost pile years later—but it’s awful to lose a great or expensive one permanently.
2Keep Tools Clean
- After use, scrub off dirt under garden hose.
- Rinse in diluted household bleach if there’s a chance of disease transmission. One formula is 4 teaspoons bleach per quart or liter of water for at least one minute.
- Dry thoroughly.
This can both prevent the spread of disease between plants and prevent corrosion.
Disinfecting With Bleach (Sodium Hypochlorite)

The Center for Disease Control (CDC) recommends:
Soak or spray any hard (non-porous) items for at least one minute in a bleach solution using household bleach (5 to 9% sodium hypochlorite) and room temperature water.
- 1 teaspoon (5 ml) of bleach per 1 cup (250 ml) of water or
- 4 teaspoons (20 ml) of bleach per quart (950 ml) of water or
- 1/3 cup (80 ml) of bleach per 1 gallon (16 cups) of water
Follow all precautions on product including:
- Clean and dry items before disinfecting.
- Wear protective equipment including gloves and eye protection.
- Never mix bleach with ammonia or any other cleanser.
- Work in well-ventilated area.
Also note that bleach solutions will not be as effective after being mixed with water for over 24 hours. .
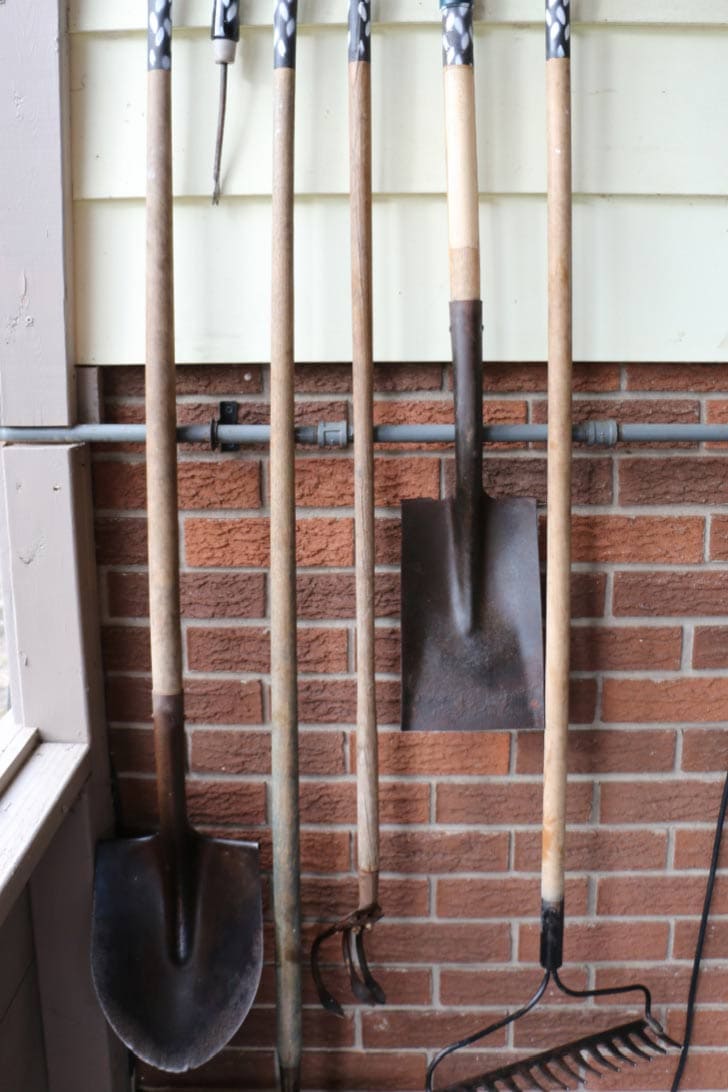
3Handy Storage
- Before storing your tools, be sure they are both clean and dry.
- Store tools hanging up. See how I create tool hangers (below).
If every tool has a designated place, you’ll notice what’s missing at the end of your gardening day.
4Maintenance
This could be an annual task or more often if your tools get a lot of use.
- Protect wooden handles with boiled linseed oil.
- Tighten loose screws.
- Lubricate moving parts with 3-in-1 oil or WD-40. Your tool manufacturer likely has specific recommendations.
- Sharpen – learn to do it yourself or take tools with dull or nicked blades to professional sharpener.
Painting Tools & Adding Hangers
Make your garden tools stand out with painted handle ends and easy to store with wire hangers.
Drill Hole

Drill holes through top of wooden handles. Position the hole so that bulky rake heads will hang parallel to the wall.
Sand
Sand wood handles so they are nice and smooth to touch without splinters.
Add Painter’s Tape
Protect the non-paint areas with painter’s tape.
Paint
Paint end of tool to make it visible in the garden. Orange and blue are both good options. I used black paint with white dots because I had both on hand.
Use an exterior (outdoor) primer-paint combination product or stain suitable for wood surfaces.
You can also add a protective coat of outdoor polyurethane or a similar product if you want the paint to remain pristine. I don’t bother with this.

Stencil (Optional)
Nerdy idea: I created a simple leaf stencil with cardstock and used white spray paint. Allow to dry.
Add Hanger

Add loop of wire for hanging tools on hooks.
Suspend From Hooks

I find cup hooks work fine for hanging my garden tools.
My black and white tool handles are easy to see in the garden plus they match my stenciled wheelbarrow and lawnmower, of course. It was worth doing it just to see how it made my husband laugh!
Tool Storage Idea

I built this tool storage shed on wheels to keep on our covered patio. Every tool has a place and I use it every day.
~Melissa the Empress of Dirt ♛