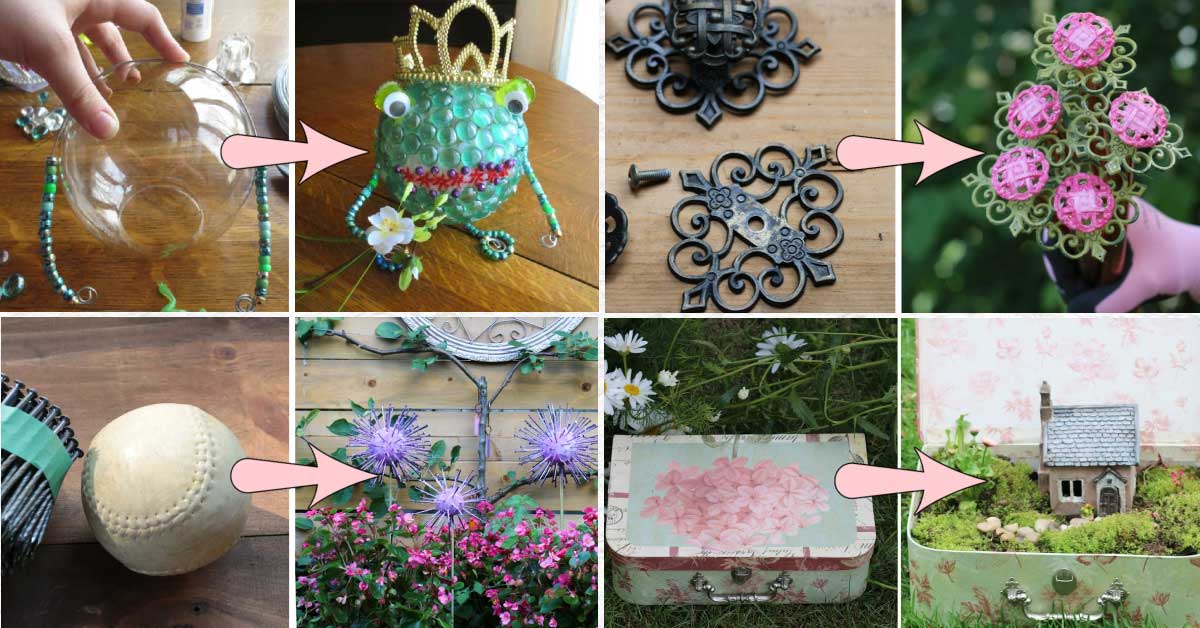
How to turn a bowling ball or glass globe into a whimsical, durable frog prince for your garden using frugal dollar store finds.
For more, also see these creative project tutorials.

DIY Garden Art Frog Prince

A friend saw a garden art frog prince during a garden tour and asked me to make one. She didn’t have a photo, so all I had to go by was ‘it’s round, green, funny, and wears a crown’. Okay. I can make one of those! I confess, it’s not my usual style, but I was up for the challenge.
For Experienced (Or Adventurous) Crafters
This project is suitable for a crafty person with some experience (or someone willing to experiment). I say this because I work with thrifted items so your supplies are not going to be the same as mine: you’ll have to make some decisions and adaptations along the way to make it work.
Anatomy Of A Frog Prince
The frog prince is basically a ball (sturdy lamp globe or bowling ball) with wire arms and legs attached, and the body (ball) is covered in flat-bottom marbles. The accessories —crown, flowers, and whatever else you dream up—make it charming.
Frog Prince Tutorial

Get the Free Printable
There’s a free printable with this article.
Go to Resources (below) to get yours.
Materials
I’ll tell you what I used and also give some suggestions for alternate materials. I like to make-do with things I have on hand or can find used at yard sales or thrift shops.
Body
- Sturdy glass lamp globe, fish bowl, round vase, or old bowling ball (it will be easier to attach arms and legs if you use a bowling ball and can drill small holes in it).
- Flat-bottom marbles (green). My globe is 7″ in diameter and I used approximately 220 (3/4″) flat-bottom marbles.
TIP: If you will doing a lot of projects using these marbles, there are sellers online who sell them in bulk.
Arms & Legs
- 16 – 20 gauge wire and beads (green, blue).
Eyes
- Plastic ice cubes or ping pong balls or tea lights (pick something lightweight that will adhere easily).
- Bottle caps (for eyelids-optional).
- Googly eyes, two flat black marbles, or something to else you can attach that looks like eyeballs. Or you could paint them on.
Mouth
- Red beads or flat-bottom marbles or paint.
Embellishments
- Crown, synthetic flowers, toy diamond ring, toy ladybug, butterfly, bee, glass slipper…
- Plant pot stand or toy chair (for frog to sit on).
Bonus Points
- If you use a bowling ball, you can drill a hole in it to hold a fork painted red (with spray paint or nail polish) as a long tongue catching a fly.
Tools & Adhesive

- Needle-nose pliers for bending arm and leg wires.
- Silicone sealant (waterproof, outdoor, clear-drying) to use as adhesive.
- Caulking dispenser (for silicone sealant in a tube).
Assembly
You’ll need to work in sections, allowing the silicone to dry so the marbles don’t shift as you move the ball around.
1Prepare Arms & Legs
This is where you have to use your crafty sense and adapt.
If you’re using a bowling ball body, you can make separate arms and legs (with wire and beads) and insert them into drilled holes.
For my glass globe body, I did the following:
- I used 16 gauge wire. I used one long piece for the arms and one for the legs. The length you need will depend on how large your body ball is—you’ll need approximately 3x the diameter of the ball.
- The middle section of each wire is going to wrap around the body ball (see photo below). Test it out to see how what length you’ll need, allowing enough length for forming hands/feet with some twists or spirals.
- Twist one end of the wire with the pliers to form whatever sort of hand/foot looks good to you. I played around with a few shapes (hoping for something like a webbed foot) but settled on a simple spiral. You may want the feet to be larger than the hands.
- Add enough beads to fill the space from the hand/foot to the body x2. No beads are needed on the section of wire that will wrap around the body because it will be covered with marbles.
- After adding all the beads, form the second hand/foot with the pliers—this keep the beads from slipping off the wire. My frog arms used 36 beads total.
Here’s one of the hand/foot ideas I tested out:

Here I’m testing out the wire arms to see how they look:

2Prepare Eyes
- I used green plastic ice cubes but you can use anything that seems eyeball-ish to you. Ping pong balls would work too.
- Attach or paint on the eyeballs and eyelids (I used bottle caps) and allow to dry.
- Have eyes ready to attach to body during next step.
3Decide Where Parts Go
Decide where you want the arms, legs, eyes, and mouth to go.
You could mark the areas on the body with a Sharpie marker if that helps. The flat-bottom marbles will be applied over the wires, around the eyes and mouth, and covering the rest of the body.
4Attach Arms, Legs, & Eyes
This part can get messy and requires a sense of humor and willingness to adapt, as much of life does. Keep a damp rag available for wiping off your fingers.
- If you’re using a bowling ball, drill tiny holes to insert the arm/leg wires and a tongue (if you’re adding one), and attach the eyes. It will look particularly frog-ish if you put the eyes fairly far apart.
- Attach the arm and leg wires to the globe by applying silicone sealant (works as adhesive), holding the wire in place, and adding marbles over top. Decide where you want the eyes and add marbles around them. As the silicone sets, it will hold everything in place. You may want an assistant to hold things in place while you work.
- TIP: Set aside any smaller marbles (or green beads) for filling in little gaps between the body marbles.
Here you see the frog with his arm/leg wires attached, eyes in place, and marbles over top the wires to hold everything in place. I’ve set the lamp globe on a cup to hold it steady and off the table while I’m working:

5Make Mouth
- Attach red beads (or whatever you’re using) to form a nice wide mouth. I outlined my frog’s mouth with blue/purple beads for more definition.
- Now is a good time to set the green body marbles all around the mouth.

6Add Body Marbles
- Cover all remaining areas of the body with flat-bottom marbles.
- You might want to fill in any gaps with smaller marbles or green beads.
- As mentioned, you’ll probably need to work in sections and let one area dry before working on the next.
7Embellish Your Prince
When everything is dry, it’s ti7me to dress up your Prince.
Some ideas include:
- A crown (kind of essential, I think), toy— flowers, bugs, diamond ring, a throne or chair, little flower pots, watering can… anything you like!

And he’s ready for the garden. Clearly this is one of the goofiest garden art items I’ve ever made but it was fun to figure it out. I’m not sure if he’s hideous, cute, or a bit of both!
Resources
Empress of Dirt
FREE TIP SHEET
DIY Garden Art Frog Prince
File provides tips for making this dear little frog prince.
The download link will be sent to your email.
Joining our free newsletter list is optional at checkout.
Ebook

25 Garden Art Projects & Ideas
by Melissa J. Will
Reader’s favorite garden DIY projects and ideas from the Empress of Dirt website.
PayPal, Credit Card, Apple Pay
This ebook is a digital file (PDF format) you save to your device. It is not a physical product.
Prefer the real thing? Learn how to attract native frogs and toads to your garden.
~Melissa the Empress of Dirt ♛