This staircase plant stand is inexpensive, easy-to-build, provides a lot of vertical growing space, and works both in the home and garden. Made from ready-made stringers from a home improvement store, you can build it in an afternoon.
For more easy building projects also see 32 DIY Wood Decor Projects for the Garden.
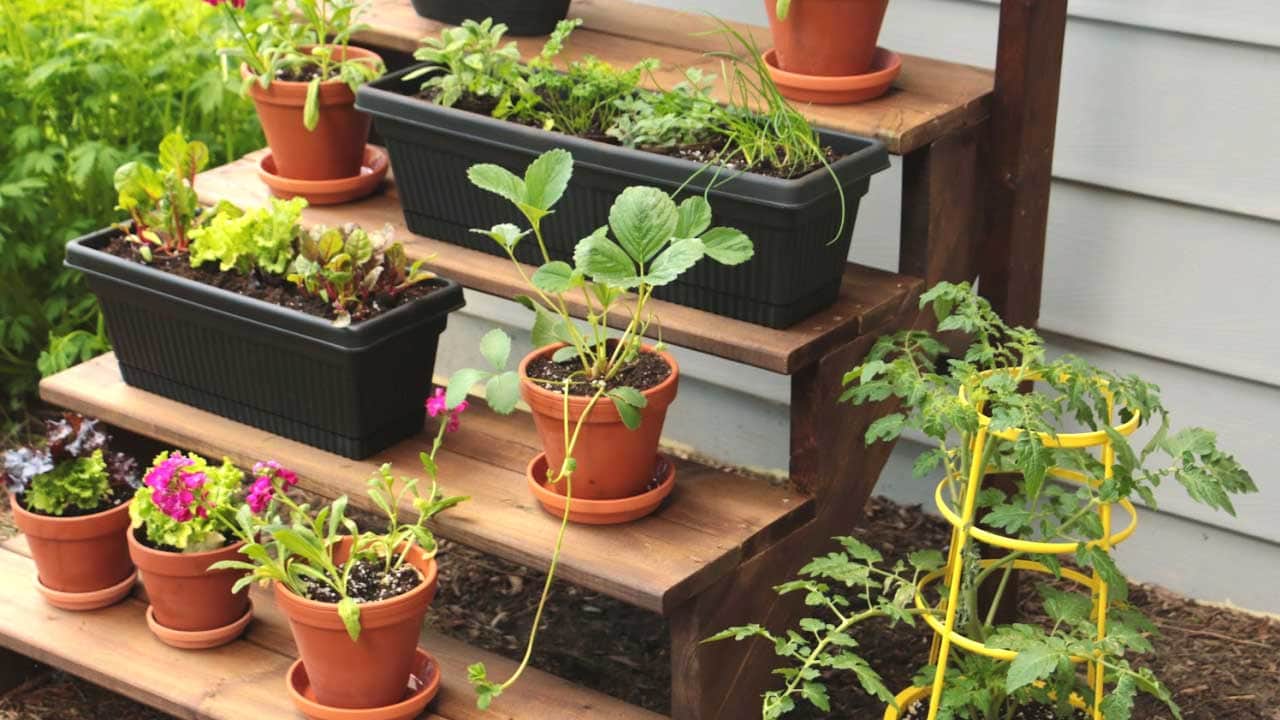
DIY Staircase Plant Stand

A staircase plant stand provides a simple way to give container plants of various heights room to grow and soak in the sun.
What makes this project so simple is, you can buy the stringers ready-made, so you just have to add wood for the steps and support posts and you’re done.
Fast & Frugal
- The materials to build the stand cost just $100 Canadian. It will be less in the United States.
- Designed for a beginner builder, this project can be made in an hour or two.
Kitchen Garden-Friendly
- On a stand like this one, you can move the pots around to suit the light needs of the various plants and keep everyone happy. It’s perfect for a container food garden with various vegetables, fruits, and herbs.
- It’s also very handy to have everything in one place for watering.
Tons of Growing Space
- If you make use of the steps, side supports, and the top copper bar, there is a lot of room for potted, climbing, and hanging plants.
Bonus Tip
- If you get the wood cuts done at the store, you should be able to fit all the materials in a mid-size car. That’s what I did.
Year-round Use
- Use it outdoors in the summer and bring it indoors for winter plant storage in front of sliding glass doors.

Related: How to Build a Decorative Garden Ladder
How to Build a Staircase Plant Stand

There are printable instructions at the bottom of this article.
Materials
Brown pressure-treated lumber was used in this project.
- (2) 4-step stringers
- (2) 2-in x 4-in x 6-ft cut lumber
Cut 2-in x 4-in x 12-ft lumber into two 6-foot pieces. - (2) 2-in x 4-in x 3-ft cut lumber;
Cut 2-in x 4-in x 8-ft lumber into two 3-foot pieces.
Discard the remaining 2-foot piece. - (8) 5/4-in x 6-in x 3-ft cut lumber;
Cut 5/4-in x 6-in x 12-ft lumber into four 3-foot pieces.
Repeat process to collect 8 pieces total. - (1) 3-foot 3/4-in copper pipe
- (2) 3/4-in galvanized floor flange
- (48) 2 1/2-in deck screws
- (8) 1-in deck screws
- Wood stain (optional) and clean rags
- Black exterior spray paint for metal flanges (optional)
Tools
- Tape measure
- Pencil
- Circular or hand saw
- 3/32-in drill bit (for pilot holes)
- #8 screwdriver or driver bit
- Electric drill
- 220-grit sandpaper with sanding block or palm sander
Before You Start
- If you want to spray paint the metal flanges or copper pipe, do this first.
- Smooth any rough wood edges with sandpaper.
- Pre-drill all screw holes with a 3/32-inch drill bit before attaching pieces together.
1Pre-drill the step boards

- Pre-drill the step boards.
- The staircase is made from two 4-step stringers and eight 3-foot boards.
- Four 3-foot boards will be used for the back step pieces.
- Set aside the remaining four 3-foot boards for Step 2.
- Each board is attached to the step stringer with four screws (two at each end).
- Pre-drill the pilot holes. These holes should be 3/4-inch from the board ends and 1-inch in from the sides. The screws should land right in the middle of the stringer wood. Use a pilot hole to be sure you’re hitting the right spot on the stringers.
2Attach the back step boards to the stringers

- Attach the back step boards to the stringers.
- Place the stair stringers securely against a wall; you may want someone to hold them in place while you work.
- To place the stringers in the correct position, be sure the 8 1/2-inch sections are horizontal and the shorter 7-inch sections are vertical (see diagram above).
- Starting with the top step, line up the edge of the first board with the outer edge of the stair stringer and secure in place with a 2 1/2-inch deck screws.
- Repeat on the other end.
- Attach the three remaining boards.
The entire unit should be 3 feet wide when assembled.
3Attach the front step boards to the stringers

- Attach the front step boards to the stringers.
- The front step boards extend slightly beyond the stringers.
- Leave a slight gap between the front and back step boards to allow for water drainage.
- Drill pilot holes and then attach the front boards to the stringers. Be sure to place these screws so they attach to the stringer wood, not in the overhanging section.
4Assemble the support frame with copper pipe

- Assemble the support frame with copper pipe The support frame is made from two 6-foot pieces of lumber, two 3-foot pieces, and a copper pipe secured with flanges for hanging plants.
- Assemble the support frame with copper pipe and flanges.
- Use 1-inch screws to attach each floor flange to each 6-foot pieces of lumber above the copper pipe. The top edge of each flange should be three inches from the top of the lumber.
- Secure the copper pipe in the flanges.
- Assemble the support frame with copper pipe
- Drill pilot holes and then attach a 3-foot pieces of lumber between the tops of the 6-foot pieces of lumber above the copper pipe.


5Attach the support frame to the staircase steps

- Attach the support frame to the staircase steps.
- Place the staircase steps in a level position and line up the back edge of the support frame with the back edge of the stringers.
- With the staircase level, secure the support frame to the sides of the stringers with four 2 1/2-inch deck screws.
- Attach the remaining 3-foot piece of lumber between the support frame, behind the staircase steps, approximately 16 inches from ground. This gives the whole unit extra stability.
6Stain or paint as desired

- Stain or paint as desired. I opted to give my plant stand a final coat of brown wood stain.
7Add plants

~Melissa the Empress of Dirt ♛

How to Make a Staircase Plant Stand
Supplies & Materials
Lumber
- 2 4-step Wood step stringers pre-made
- 2 2x4x6-ft Lumber
- 2 2x4x3-ft Lumber
- 8 5/4"x6"x3-ft Lumber
Other Materials
- 1 3-ft 3/4" Copper pipe
- 2 3/4" Galvanized floor flange
- 48 2-1/2" Deck screws
- 8 1" Deck screws
- 1 Quart Wood stain (optional)
- 1 Can Black spray paint (optional – for flanges)
Instructions
Optional Prep
- If you want to spray paint the metal flanges or copper pipe, do this first.Smooth any rough wood edges with sandpaper.Pre-drill all screw holes with a 3/32-inch drill bit before attaching pieces together.


Prepare Step Boards
- The staircase is made from two 4-step stringers and eight 3-foot boards.Four 3-foot boards will be used for the back step pieces.Set aside the remaining four 3-foot boards for the next step.Each board is attached to the step stringer with four screws (two at each end).The screws should be attached 3/4-inch from the board ends and 1-inch in from the sides. The screws should land right in the middle of the stringer wood. Use a pilot hole to be sure you're hitting the right spot on the stringers.
Attach Back Step Boards to the Stringers
- Attach the back step boards to the stringers.Place the stair stringers securely against a wall; you may want someone to hold them in place while you work.To place the stringers in the correct position, be sure the 8 1/2-inch sections are horizontal and the shorter 7-inch sections are vertical.Starting with the top step, line up the edge of the first board with the outer edge of the stair stringers and secure in place with a 2 1/2-inch deck screws.Repeat on the other end.Attach the three remaining boards.The entire unit should be 3 feet wide when assembled.
Attach Front Step Boards to the Stringers
- Attach the front step boards to the stringers.The front step boards extend slightly beyond the stringers.Leave a slight gap between the front and back step boards to allow for water drainage.Drill pilot holes and then attach the front boards to the stringers. Be sure to place these screws so they attach to the stringers wood, not in the overhanging section.
Assemble Support Frame With Copper Pipe
- The support frame is made from two 6-foot pieces of lumber, two 3-foot pieces, and a copper pipe secured with flanges for hanging plants.Assemble the support frame with copper pipe and flanges.Use 1-inch screws to attach each floor flange to each 6-foot pieces of lumber above the copper pipe. The top edge of each flange should be three inches from the top of the lumber.Secure the copper pipe in the flanges.Assemble the support frame with copper pipe.Drill pilot holes and then attach a 3-foot pieces of lumber between the tops of the 6-foot pieces of lumber above the copper pipe.
Attach Support Frame to Staircase Steps
- Attach the support frame to the staircase steps.Place the staircase steps in a level position and line up the back edge of the support frame with the back edge of the stringers.With the staircase level, secure the support frame to the sides of the stringers with four 2 1/2-inch deck screws.Attach the remaining 3-foot piece of lumber between the support frame, behind the staircase steps, approximately 16 inches from ground. This gives the whole unit extra stability.

Paula J says
My husband put one of these together for me. He said it was really easy to do. Now I am going to sand and stain it. So excited to have this great stand to display my plants!!
Melissa J. Will says
Fabulous! So nice to hear. I hope you have fun with it. The plant arrangement possibilities are endless!
Kate Daniels says
Finally clear, straightforward, instructions for the plant stand I’ve been searching to make!! I’ve been skimming through countless websites looking for instructions on how to make this. Yeah its pretty basic but so many other sites embellish way to much or act as if us DIYers are contractors with years under our belts, speaking all this jargon I just didn’t have the patience to understand. Thank you for a very well laid out, easy to read, yet perfectly informative instructions for a very well engineered plant stand! A+++++++
Melissa J. Will says
Thank you, Kate!