This DIY tomato cage is easy to build and provides excellent support for growing tomato vines while preventing the tender stems from breaking. They are a budget-friendly alternative to metal and plastic tomato supports.
This is part of a series on What to Know Before You Grow Tomatoes.
Why We Need Tomato Cages

Tomato | Genus: Solanum
12 Sweet & Juicy Tomato Growing Tips
Annual vegetable, truly a berry
- Vines (indeterminates) or bushes (determinates)
- Full sun – at least 6 hours total direct sun per day
- Soil: well-draining and fertile
- Propagation: seed or cuttings
- Pollination: self-fertile with help from wind and insects
- More Tips: DIY tomato cages | Seed Saving | Ripen after picking
I have been growing tomatoes for decades, but I never invested in proper cages until recently. Why? I kept kidding myself I’d just try a few more varieties each year and then move on to other veggie adventures.
But you can’t stop. There are 15,000 choices out there and each is more intriguing than the next.
There are two basic types of tomato plants: bush (determinates) and vine (indeterminates).
Most bush tomatoes (“determinate” tomatoes) can usually cope without support, but it’s the ever-growing vines (“indeterminate” tomatoes) that truly benefit from some surrounding structure.
A good cage or other support system allows you to train the plant and avoid accidental stem breakage.
You can use the cage in the ground or on top of a same-size container. I use them for a variety of climbing plants as well as tomato vines.
If you learn to rules of pruning (see How to Grow Tomatoes from Cuttings), and provide a cage, your tomato plant will have good air flow and excellent support.
These cages are made from wood but there are also excellent options for building tomato cages from wire panels (aka hog or cattle panels) sold at farm supply stores. I haven’t tried this simply because they are large (4×8 or 4×16 feet) and I have no way of transporting them home from the store.

How to Make Tomato Cages from Wood


Supplies and Materials
These cages are 5-feet tall, 18-inches wide on one side, 19.5 on the other. This size suits the usual height my climbing tomatoes reach by the end of the growing season (6-feet).
The width is also right for fitting around tomatoes planted in 14-inch diameter pots.
I always suggest working with the available lumber size so there are not wasteful off-cuts.
Tip: Paint or Stain Wood Before You Build
You may prefer to paint or stain the wood prior to assembly and then just touch it up when done.
Wood
- (4) 2x2x60-inches
- (18) 1x2x18-inches
- (2) 1x2x16.5-inches
See what you can get at your local lumber store. A long-lasting wood like cedar is ideal but not always in the budget.
For this project I used untreated spruce strapping. It’s inexpensive (good) but prone to twisting and warping unless stored properly before building. It’s fine once it’s screwed in place.
DISCLAIMER I do my best to provide accurate plans but please double-check everything before you cut your lumber.
Actual Lumber Sizes
- 2x2s are 1.5×1.5-inches
- 1x2s are .75×1.5
Hardware & Tools
- (40) 2-inch deck screws
If you have a nailer, use that instead of deck screws. - Drill bit for predrilling holes
- Screwdriver
- Electric drill
- Pencil
- Measuring Tape
- Saw
- Sandpaper / sander (optional)
- Wood stain / paint
- Carpenter’s glue
- Paint brush
- Clamps

Steps
1Cut Lumber
- (4) 2x2x60-inches (2×2 lumber cut at 5-feet long)
- (18) 1x2x18-inches (1×2 lumber cut at 18-inches long)
- (2) 1x2x16.5-inches (1×2 lumber cut at 16.5-inches long)
2Assemble the Two Main Rails
Tip: Use Carpenter’s Glue
Use carpenter’s glue wherever you join wood with screws.
Hold in place with clamps until glue has set.
Each main rail has two 2x2x60-inch pieces and four 1x2x18-inch pieces.

The horizontal rails will extend beyond the 2x2s to allow room for the side rails. My rails are .75-inches thick so this is the amount each one will overlap the 2x2s (for front and back only).
The easy way to measure the placement is to use a piece of 1×2 as your measure (see ‘temporary wood spacer’ in photo):

Always predrill your holes so the screws will not split the wood.
Attach the top rail first. Be sure everything is square and level.
The top edge of the second rail is positioned 14.25-inches below the lower side of the top rail.
The top edge of the third rail is positioned 14.25-inches below the lower side of the second rail.
The top edge of the lowest rail is positioned 14.25-inches below the lower side of the third rail.
3Attach Side Rails
Attach side rails to two main sections.
You can add the inner supports during this step while it’s still easy to reach inside the cage.
Use of the wood spacer for the main rails left a nice spot to add the side rails:

Attach the top side rail first. Then the bottom rail. Then the other two.
Here’s a closer view showing the inner supports:

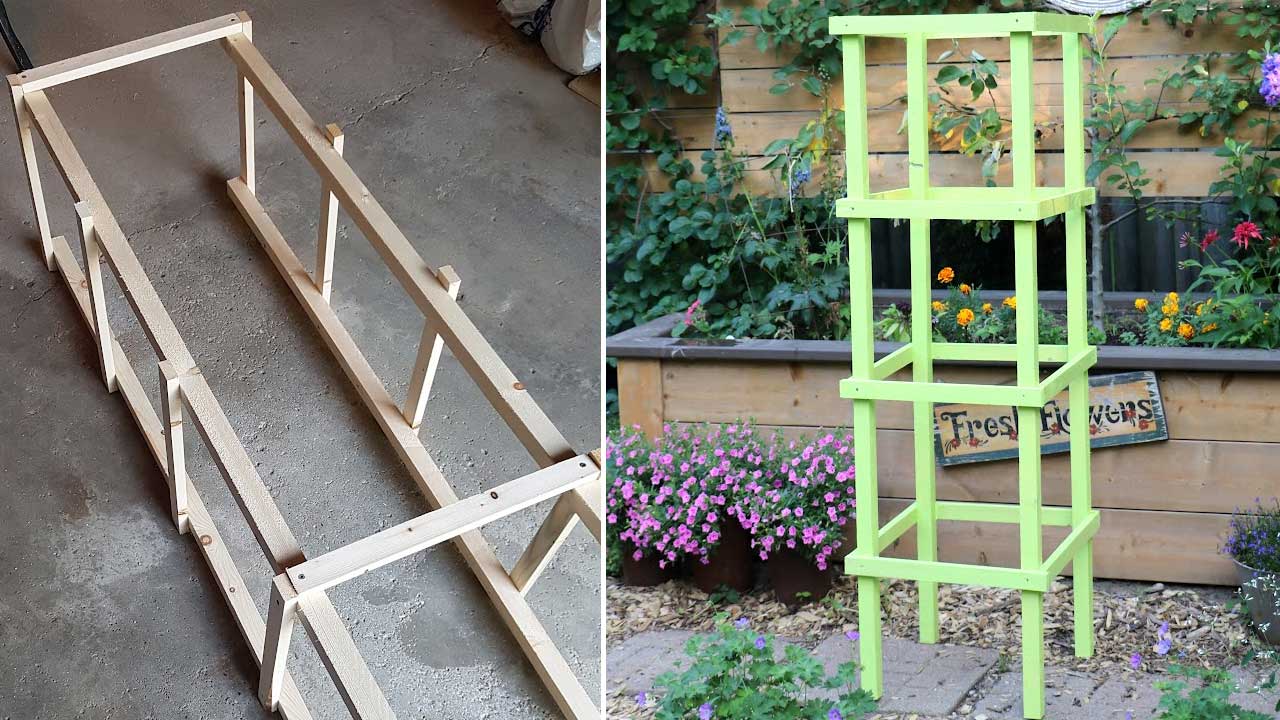
4Paint or Stain
I like using a cheerful paint or stain color that contrasts with the tomato plants. This makes it easier for pruning (read about pruning tomatoes here) and adds some zing to the garden.
Here’s one in light green:

And blue:

These cages are very sturdy, and the wood rails allow the use of additional wood or twine to further secure the tomato plants as needed.
When not needed for tomatoes, they work as supports for numerous other vining plants in the garden as well.
~Melissa the Empress of Dirt ♛

How to Build a Wooden Tomato Cage
Equipment
- Wood stain or paint
- Paint brush
Supplies & Materials
- 4 60-inch 2×2 lumber for support posts
- 18 18-inch 1×2 lumber for cross posts
- 2 16.5-inch 1×2 lumber for cross posts
- 40 2-inch Deck screws or nailer
Instructions
Cut lumber
- (4) 2x2x60-inches (2×2 lumber cut at 5-feet long)(18) 1x2x18-inches (1×2 lumber cut at 18-inches long)(2) 1x2x16.5-inches (1.2 lumber cut at 16.5-inches long)
Assemble the Two Main Rails
- Each main rail has two 2x2x60-inch pieces and four 1x2x18-inch pieces.

- The horizontal rails will extend one inch beyond the vertical supports.
- Attach the top rail first.The top edge of the second rail is positioned 14.25-inches below the lower side of the top rail.The top edge of the third rail is positioned 14.25-inches below the lower side of the second rail.The top edge of the lowest rail is positioned 14.25-inches below the lower side of the third rail.


Attach Side Rails
- Attach the top side rail first. Then the bottom rail. Then the middle two.
- During this step, add the inner supports (two 18-inch and two 16.5-inch).
- Attach side rails to two main sections.


Paint or Stain
- Paint or stain the inner support rails (and allow to dry thoroughly) before attaching to cage.
- Allow to dry thoroughly before use and be sure to set up your cage before your tomato plant gets big.
