These ten smart and frugal hacks solve simple garden problems without the need to buy anything. Use what you have and save your money for the important stuff.
I also have 24 Clever Garden Problem-Solvers here.

Frugal Garden Hacks

When you have the frugal gene, running to the store to buy something to solve a simple problem is absolutely the last resort. I love the challenge of solving a problem only using the resources on hand. And, if not from home, then bartered or from the thrift store.
These garden hacks are neither brilliant nor original (I’m guessing) because the world is sprinkled with like-minded people who have the same problems and come up with the same solutions. Perhaps one day we’ll all fly flags so we can find each other.
Despite what decluttering experts say, do keep that kitchen junk drawer stocked with odd bits and bobs. The trick is to keep things nicely sorted so you can see everything at a glance and know just what you have. Between the contents of our junk drawer and good glue, we have saved a lot of money (and waste) over the years by repairing rather than replacing.
Here’s some hacks and repurposes for the garden.

1Serrated Kitchen Knife Edger

If you like nice, crisp borders for your garden beds, it’s going to take some work. A really sharp spade can go a long way, but I also have a secret weapon to complete the job.
Serrated kitchen knife to the rescue! Yes, please don’t laugh. I’m very relaxed about garden care except for edging. I like things crisp! Tidy edges frame the garden making even a super-weedy flower bed look so much better. Not happy with clippers or a spade, I tried using an old serrated kitchen knife on a whim and never turned back.
Grab a spare from your kitchen drawer or pick one up at the thrift store.

2Bundt Pan Umbrella Table Planter

You can imagine how this one first came about. Some creative person was probably getting the patio ready for an outdoor party. Everything looked good but that gaping hole where the umbrella fits through the table top was not pleasing.
Bundt pan to the rescue! Well, technically, the one I used is a spring-form bundt pan, but any pan with a hollow middle will do. Just add drainage holes.
These pans are deep enough for plant roots and perfect as centerpieces. I plant mine with succulents, careful never to over-water since there are no drainage holes in the pan.

3Wooden Spoon Plant Marker

What’s the number one reason gardeners lose plants? I don’t actually know. But near the top of the list must be forgetting what we’ve planted. It all seems so simple when you put a nice, new plant in the ground, but come spring, when the garden is coming back to life after a long winter, it can be difficult to identify plants as they’re just emerging from the soil. Plus, there are so many weeds that look similar!
Wooden spoons to the rescue! Old wooden spoons (ever burn one?) are very useful plant markers in a pinch. Grab an oil-based paint pen (they don’t fade in the sun) and jot down the name of the plant or get out the crafting wood-burning tool and make it fancy. You can always get longer-lasting, heavy-duty tags later.
Love garden art plant markers? See 25 Creative DIY Plant Tags & Markers for all sorts of crafty ideas for marking flowers, fruits, and veggies in the garden.

4DIY Seed Tapes

I would not recommend this for larger gardens, but if you’re growing a small veggie or flower garden—either in the ground, containers, or raised beds—you’ve probably had a problem with tiny seeds (including carrots) not germinating (or moving around after sowing), you may want to use homemade seed tapes.
Paper napkins to the rescue! How does it work? You make a flour paste and attach the seeds to the napkin, spacing them out as recommended on the seed packet instructions. The entire thing is planted, the napkin slowly disintegrates, and the seeds germinate right where you want them.
And, you can make them months ahead of time and store them until you need them.
I’ve provided complete instructions here: How to Make Seed Tapes for Tiny Seeds.

5Food Jar Mobile Phone Speaker

What in the world? I know some people just want to be unplugged in the garden, and that’s fine, but if you need your phones handy, this is for you.
Food jars to the rescue! Keep your phone safe in a mason or food jar. The glass amplifies the sound—but not too much—so you can hear the music but not broadcast it so loud that it disturbs your neighbors. I attached mine to a mesh food skimmer, creating a handle that holds it nicely in place.
6Shovel with Measuring Tape
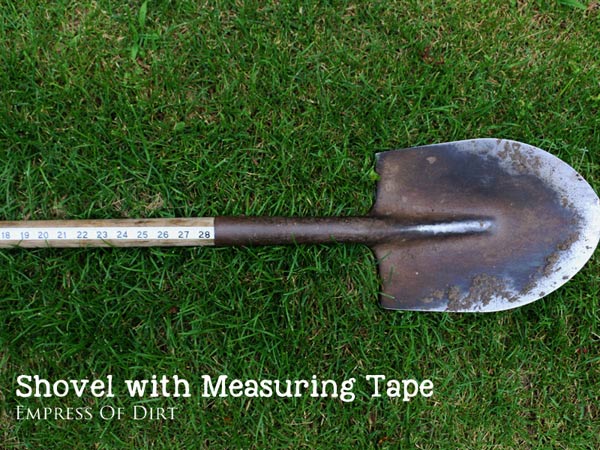
Each type of plant has its own growing requirements including the recommended distances for spacing seeds (or transplants) to allow room for future growth.
Measuring tape to the rescue! I did this on a whim and it has ended up being a very handy garden tool.
I didn’t want to mess up my workshop measuring tape, so I found an old vinyl measuring tape and attached it to my shovel handle using outdoor Mod Podge. It’s very useful. I use it to space seeds, monitor the growth (height) of new plants, and measure borders for new garden beds.
7Duct Tape Pest Catcher

Pests are inevitable in the garden, and, to be fair, everything has a place in the food chain. What may be a pest to us is often lunch for a beneficial insect. One common example is aphids (pictured). They can cover the stem of a plant and look gross, but, give it time and the ladybugs show up to eat them. I don’t know if this has actually been measured, but the estimate is that in their short lifetimes (one year), ladybugs eat approximately 5,000 aphids. Pretty good!
My arch-nemesis is Japanese beetles (Popillia Japonica). Because they are an invasive species, we’re short on predators so hand-picking seems to be my best option.
Duct tape to the rescue! I wrap the duct tape (sticky side out) around my fingers and brush it up against the beetles. They stick to the tape, making it easy to tap them off into a container of soapy water. Without the tape, they often fall into the garden soil where I can’t find them. My complete routine for removing the beetles is here.
8Food Colander Stone Cleaner

It’s important to keep any wildlife feeders clean to avoid the spread of disease.
If you have a birdbath or butterfly feeder with stones in the basin, this trick will make cleaning easier.
I keep an old kitchen colander by my garden hose. To clean the feeder, I pour the stones in the colander, give them a good rinse, and wash out the feeder bowl. Easy!
Regular cleaning prevents mold and algae from forming.
To disinfect, after removing visible debris with a scrub brush and soapy water, soak in a bleach solution (4 teaspoons bleach per quart of water for at least one minute). Rinse well and allow to dry before use.
9Damp Towel Seed Tester

Not sure if your garden seeds are still viable? Test them before sowing in soil.
Keep in mind that some types of seeds take weeks or even months to sprout (check your seed packet for details), but most germinate within days so it’s fairly quick to test viability of the faster growing ones.
See the complete seed germination test instructions here.
If they don’t sprout in the expected amount of time, it’s best to start fresh with new seeds.
Here’s more tips on figuring out why seeds won’t germinate.
10Binder Clip Plant Tags

This is a good lazy gardener tip.
I do this all the time when I’m adding new plants from the nursery and need a quick, reliable tag.
Binder clips to the rescue!
I clip the nursery plant tag or seed packet to one of my old metal plant markers and hold it in place with a binder clip. The tag stays in place and there’s no risk of me forgetting what I planted. Easy!
Over time, the binder clips get slightly rusty but even with outdoor use they last for many years.
And that’s it!
For more tips, see 24 Clever Garden Problem-Solvers Using Household Items.
~Melissa the Empress of Dirt ♛