If you started seeds indoors and they are not germinating or sprout but then struggle, this will help troubleshoot the problem.
If you’re just getting started, this shows my indoor seed starting setup including my favorite, low-budget supplies.

Seed Starting Problems & Solutions

Whether you are a new gardener or have some experience growing plants from seed, there will always be times when it doesn’t go to plan.
Even when you follow sowing instructions carefully, some seeds may never sprout or, if they do, they grow briefly and then stop.
The examples here show seeds started indoors but many of the tips also apply to seeds sown directly outdoors.
Contents
- Seeds Never Germinated
- Germination Started Then Stopped
- Seedlings Wilted
- Weak Plants
- Pests & Diseases
1Seeds Never Germinated
It’s beyond the expected days to germination and there is no sign of growth.
If your seeds never sprouted, it could be one or a combination of these factors:
Did you start with fresh, good quality seeds? Seed packets often have dates indicating freshness.
Are you sure they were viable? It’s easy to test most seeds in moist paper towel to see if they will germinate.
The more recently seeds are harvested, the better they germinate. Some seed packets list a sow-by date.
And, no matter how reliable the source, there are always a few duds in the lot (that’s nature). Check if the expected germination rate is listed on the package. Some types of seeds have very good germination rates (e.g. every 8 out 10 seeds should sprout), while others have naturally low rates (e.g. 4 out of 10 may sprout).
Going forward, be sure to get fresh seeds from a trusted source and always plant a few extras.
Sowing Method and Care
Did you sow them as directed?
Every type of seed has its own preferences. Read your seed packets for specific instructions. Some require presoaking, prechilling or moist stratification over a specific period of time, or a scratch of their coats (scarification) to encourage germination. Others can be directly sown. Do not skip the advice given: it’s often key to success.
From there, it matters how deeply they are sown. Most are sown just twice as deep as the seed is wide. Others—not many but some—go on the surface because they need light for germination.
Those seed packets provide a lot of valuable clues! This shows how to read seed packets and give your seeds their best shot.
Did you keep the growing medium moist all through the germination and growing stage?
When we store seeds, they are dormant. To sow them, we wake them up with warmth, moisture, and then air and light. If a newly sown seed is not consistently in contact with the moist growing medium, it may dry out and die. Nice, even moisture—not too wet or dry—is key.
Did you use growing medium intended for seed starting?
We use special seed starting mixes for sowing seeds indoors because they provide just what the seeds like in these special indoor conditions.
Seed starting mixes (Amazon) are lightweight and make it easy for the seed to receive moisture without having to fight to grow. I use organic potting mix intended for growing vegetables. Garden soils and other potting mixes can be too heavy for the wee seeds and, if sourced outdoors, may introduce pathogens (no, thank you).
Here’s a list of recommended supplies for sowing seeds indoors.
Was your growing space warm?
There are two different temperature groups for seed starting: seeds that like some warmth, and others that like more warmth—but not too much. If your room (or water or growing medium) is too cold or warm, seeds may struggle, die, or never germinate.
Most seeds germinate nicely with indoor temperatures of
65-75° F (18-23° C).
There is not one ideal temperature for all seed types but a good compromise is between 65-75° F (18-23° C).
For specific recommended soil temperatures, see this chart for flower seeds and go here for vegetable seeds.
2Germination Started Then Stopped
Your seeds were sprouting and everything seemed fine and then growth stopped.
Your seeds may have started off nicely but then they stop. Any changes in environment can bring everything to a halt.
Temperature swings, drafts, lack of light, low humidity, or inconsistent moisture—or some combination—are possible causes.
Did you start using central heating or air conditioning. Or, are windows left open?
Could you be over or under-watering?
Once you start the germination process, never let your seedling mix dry out. The embryo in the seed must have consistent moisture to continue growing.
On the flip side, over-watering is very common. Your seed starting mix should be consistently moist but never wet. A quick test is to hold some moistened mix in your hand. If it drips water when you squeeze it, it’s overwatered.
Plants can also be picky about humidity levels. Too low or too high and seedlings may not survive. In a home, a humidity level around 50% suits humans and many plants.
I keep a combination thermometer-hygrometer in my seed starting room (to check temperature and humidity level) and use a simple moisture meter to know when or if to water.


Thermometer-hygrometer (left) and Moisture Meter (right) | Amazon
3Seedlings Wilting
Your seedlings have some leaves but are now wilting or bending.
There could be a few things causing seedlings to wilt or die.
Temperature
Again, temperature swings could be the cause. Some warmth is good, but too much heat and seedlings wither. As mentioned, each species has its own sweet spot but, generally, soil and air temperatures between 65-75° F (18-23° C) suits most seeds.
Disease
Another cause is a group of pathogens called damping-off that like wet, cool conditions and kill or weaken seeds and seedlings. This explains the disease and provides damping-off prevention tips.
The name damping-off is strange but the condition is fairly easy to recognize. Your seedlings will either turn brown and wither or start looking like they were kicked in the knee and they gradually fall over and die.
If you think this might be it, google it and check images. And when in doubt, remove the affected plants and growing medium.
Pests
There are countless other pests that may show up as well. Fungus gnats are fairly easy to identify because they are like tiny fruit flies with sloppy flying skills—it’s more of a leap than flight.
If you notice any a lot of bugs or signs of disease, it may be time to toss everything out, clean all your gear, and start over.
Water Quality
Is your tap water salted? Or high in salts or metals? If yes, switch to a better water source. You may not notice it at first but the more you water, the more the excesses build up in the potting mix.
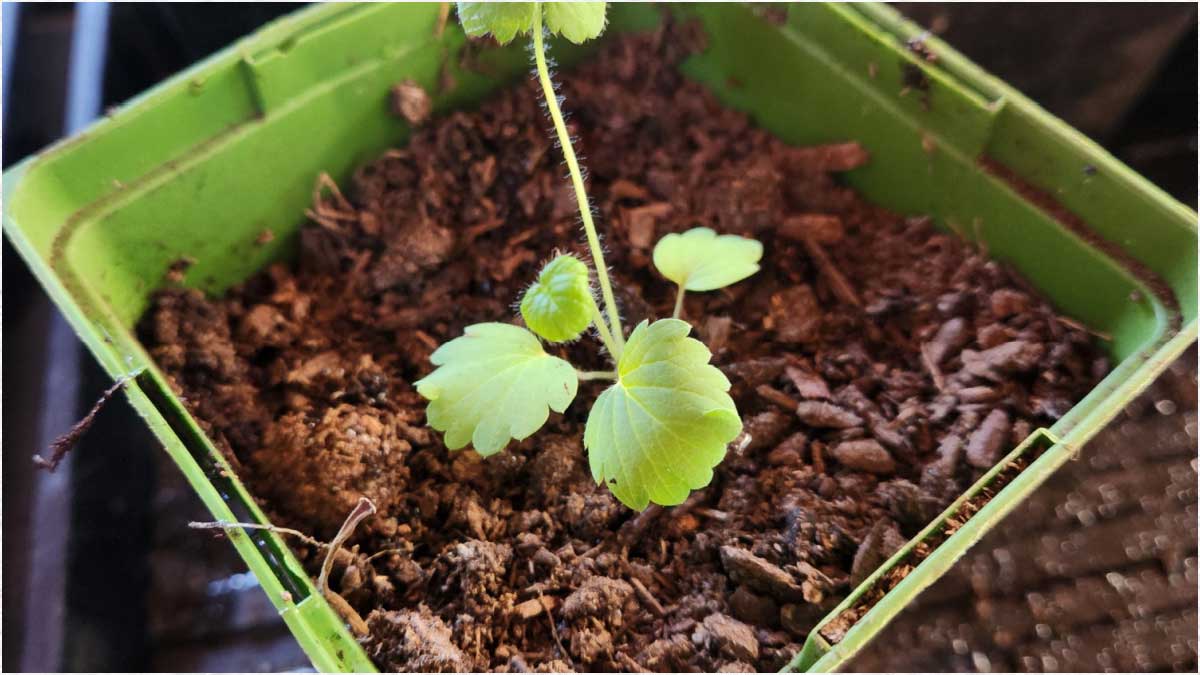
4Weak Plants
Plants are still growing but seem weak or leggy.
The most common cause of leggy seedlings is inadequate light. If a plant must work too hard to reach light, it will stretch and become thin or leggy, and appear weak.
- If you are using basic fluorescent shop lights, keep them just above the tops of the plants.
- LED lights like these Barrina full spectrum LED lights at Amazon are stronger and need to be placed further from the tops of the plants. Try different placements to find the sweet spot.
- If you’re growing in front of window, rotate the containers every day.
Less common, but possible is bad genes. Not all seeds from the same pack are created equal. There’s good ones and bad ones. Maybe you grew a dud. Maybe the dud had friends. Again, were the seeds fresh and from a trusted source?
Nutrition is important too. The plant is surviving on whatever its environment provides. For the first stages, the seed itself provides all the nutrition needed.
But once you have some true leaves, the plant begins to need nutrition from the soil. Perhaps your growing medium, or, at this stage, potting mix is deficient—not at seed germination time but several weeks later.
We tend to want to add fertilizers to solve issues, but it’s easy to overdo it. Plus, a seedling may look yellow or weak due to too much light, or too much fertilizer, and something in the water supply. And, unfortunately, there’s no simple way to diagnose it. You just have to learn from trial and error.
If the plant has a few leaves (and light is sufficient), you could add some (very diluted) organic liquid fertilizer. Follow the directions on the container and dilute it to adapt to such a small plant. Personally, I do not use any fertilizers for my indoor seedlings: their first nutrition comes with the compost added to the garden soil when they begin life outdoors.
Overheating (which is essentially the plant drying out) is really tough on plants, especially the youngsters under grow lights or at hot, sunny windows.
- Were your lights positioned just above the plants without over-heating them?
- Is the temperature in the room staying between 65-75° F (18-23° C)?
- Is the humidity near 50%?
Many plants actually like a little more than this but 50% is considered the maximum we should have in our homes, otherwise mold can form.
Overcrowding also causes nutritional problems. With too many plants competing for the same resources in a tight space, someone or everyone may lose. Are your plants adequately spaced in their own containers? It’s not an issue with brand-new seedlings, but the more they grow, the more room each plant needs.
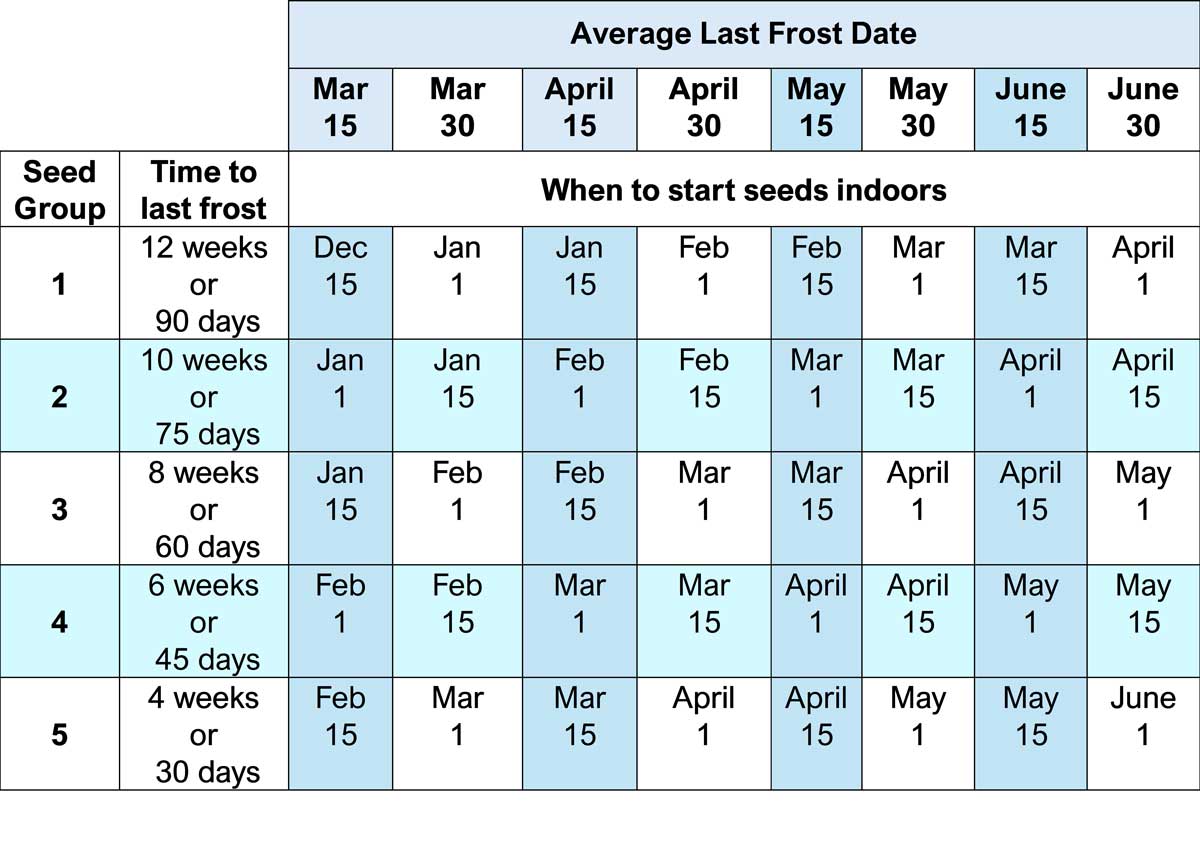
Timing matters too. You will notice on seed packets that, if a seed is recommended for indoor sowing, they will tell you how many weeks or days before your last frost they should be started.
If started too early, the plant may get to a maturity level that your indoor growing conditions cannot sustain. It needs to be outside—but most should not be transplanted until the risk of frost has passed.
Starting too late may not cause indoor growth problems but it can mean that there are not enough frost-free days outdoors for the plant to mature (fruit or flower).
These resources will help:
- How to Time Your Indoor Seed Sowing Just Right
- Simple Indoor Seed Starting Schedule | Free Printable
- Weekly Seed Starting Plan for Vegetable Gardens
5Pests & Diseases
There seems to be bugs or disease on or around the plants.
There can be a lot of different causes for this.
Did you start with clean and sanitary growing medium, containers, trays, and tags? And nice, fresh seeds (no mold or mildew)?
This shares how to clean and sanitize your seed starting supplies.
Do you have other plants nearby that are diseased or infected?
Do your houseplants already have problems? Or, perhaps you brought home a new plant and did not quarantine it first?
- Do you use an oscillating electric fan for good air circulation? This can keep insects from getting to the plants.
- Did you water consistently and moderately? Dampness encourages mold, algae, fungi, and other troubles.
This has tips on keeping your seedlings happy and healthy throughout their growth stages.
Okay, that’s quite a list!
Go easy on yourself: we all learn as we gro. There are just little things that can add up. The more you do this (seed sowing and plant growing), the more knowledgeable and mindful you will become. That’s another good reason to tend to your plants every day. Even if they don’t need anything, just becoming observant of how they look and grow at each stage is useful.
If you want to know everything about how I start plants from seed indoors, it’s all in the ebook (below).
Resources
Ebook

Seed Starting for Beginners
Sow Inside Grow Outside
by Melissa J. Will
Everything you need to get started with indoor seed starting for indoor and outdoor plants. Grow what you want—any time of year!
PayPal, Credit Card, Apple Pay
This ebook is a digital file (PDF format) you save to your device. It is not a physical product.
Find Your Frost Dates & Hardiness Zone
Plant Hardiness Zones | ![]() United States |
United States | ![]() Canada
Canada
These are listed on seed packets and plant tags to guide your choices.
Average Frost Dates | Use this calculator at Almanac.com. Enter your city and state or province to find your first and last frost dates and number of frost-free days.
Ecoregion | Learn about local native plants, animal species, and environmental conditions to make garden choices that benefit your ecosystem.
Learn More: Understanding Frosts & Freezing For Gardeners
Planting Dates in Relation to Average Last Frost
Our Podcast
NEW! Click play to listen:
~Melissa the Empress of Dirt ♛