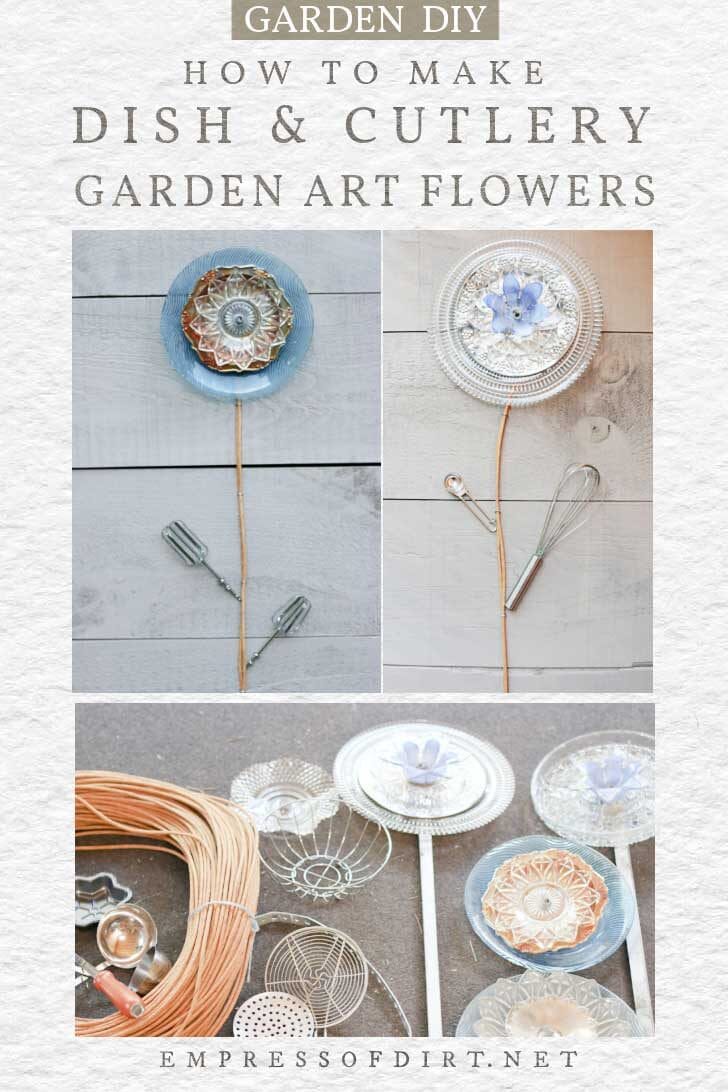
Use these step-by-step instructions to turn old glass dishes and plates into beautiful garden art flowers. We have included tips for drilling holes in plates to provide more options for assembling your flowers.
If you love DIY garden art, there are several more garden art flower tutorials here.

Turn Old Dishes into Garden Art Flowers

These DIY dish flowers have been a favorite for years. Made from as assortment of old glass plates, dishes, serving dishes, and cutlery, you have your choice of colors and styles.
If you are worried about having to drill holes through the dishes—don’t be. I’ve provided a video below showing how simple this is. The secret is to use the right drill bit and some water as you’ll see.
By drilling holes you have more assembly options and the finished flowers tend to be stronger.
If you do not want to drill, it is possible to make them using lighter-weight plates and the recommended adhesive to hold them together.

Contents
Get the Free Printable
There’s a free printable with this article.
Go to Resources (below) to get yours.
Getting Started

While you can assemble dish flowers with a good, waterproof adhesive (more on this below), unless the dishes are fairly lightweight, I find it’s best to also drill through glass plates and secure them with wire or bolts. This way the dish flowers can stay in the garden throughout the seasons without the risk of falling apart.
Metal dishes are also a nice design option but whether or not you can drill into them will have to be judged on a case-by-case basis. Some thinner metals are easy to drill with a metal drill bit while others, including some types of cutlery (used as flower “leaves” or hangers) are impossible without a drill press.
Thicker crystal or crystal-like dishes can also be too difficult to drill. I have no way to advise on this other than to say, you will figure it out as you go based on the materials you are working with. If one dish is too difficult to use, switch to another!
Design Inspiration


Dish sources may include your own kitchen cupboards, yard sales, and thrift shops.
If you need design inspiration, check Google images or Pinterest for “garden art dish flowers.” There are countless possibilities. You can use the dishes as they are or paint or embellish them. These glass paints are very good for adding details.
- Pick various sizes of dishes that look good together and fit well together.
- For the flowers you see here, I used clear and blue glass plates plus some small metal serving dishes. The metal was thin enough that I could drill through it with a metal drill bit (while wearing safety gloves and glasses, of course). For glass, you use a diamond drill bit.
- If you want to make several flowers to group together, you might want to pick a color theme (blues, reds, greens, or simply all bold colors or pastels).
I have also provided instructions for other glass garden art projects here, so if something doesn’t work for one creation, it will probably find use in another.
How to Make Dish Flowers

Flower Materials
You may need just some of these tools and materials, not all.
- Used kitchen glassware and plates, bowls, serving dishes, votive candle holders…. I choose pieces around 1/8″ thick.
- Tiered, glass serving dishes work great because they already have holes drilled in them.
- 16-gauge wire (10 inches for each flower)
- Washer and bolt (1 each per flower) or strong metal buttons with two holes (1 button per flower)
- 1 x 1 x 48″ wood posts (1 for each flower)
- 1/2″ wood screws (for attaching forks and spoons to the wooden stem)
- Old forks and spoons (to use as leaves on the wooden flower stem)
- copper pipe end cap (optional) for attaching flower to a pipe stem
Tools
- Plastic or metal dish pan (for drilling holes)
- Old towel (you might drill a hole in it)
- 5/16′ diamond drill bit ($15-20 US) – cuts glass, marble, porcelain, granite, and slate
- 1/8′ masonry drill bit (optional-if you want to make a pilot hole in the glass to keep the diamond bit from slipping
- 1/2′ titanium drill bit (for drilling holes in the forks and spoons)
- Cordless drill – not electric
- Safety glasses and protective gloves
- Masking tape (optional) for creating pilot hole
- Sharpie marker
- GE II Silicone Sealant and caulking dispenser (or similar adhesive in a tube). Also see The Glue Resource Guide for Garden Art Projects for more options.
New to Silicone Sealant Adhesive?
If you are new to using silicone sealant (Amazon) as an adhesive, read these tips first to avoid common problems.
This Guide to Adhesives also provides other options.


How to Drill Glass Dishes

This video is fairly old but it does show me drilling a hole in a dish with one hand! The other hand is hold the camera, so you can see it’s not difficult.
Tips For Drilling Glass Dishes
- Practice First | Practice first using a dish you don’t mind breaking (if it comes to that).
- Support the Dish | Always support the dish by placing a thick, folded towel underneath it. Breaks can happen when there is nothing underneath the dish to offset the pressure of the drill.
- Make a Pilot Hole | Place a small piece of masking tape over the intended drill hole area and pre-drill a starter hole using a 1/8″ masonry drill bit. The masking tape keeps the drill from slipping. The starter (pilot) hole helps the diamond drill bit stay in place.
- Apply Moderate Pressure | Drilling glass is a gradual process. Keep a steady hand, apply moderate pressure, takes breaks as needed to check how it’s going, and be patient. It will work!
- Cold Water in the bin—you guessed it—helps keep the materials from overheating.
Set-Up
- Mark the plates where you want to drill each hole with the Sharpie.
- Place thick, folded towel in bottom of dish pan.
- Add enough cold water to cover towel and the dish.
- Have dishes, drill (and drill bits), safety glasses, and gloves ready.
Drill The Glass
This will likely take from 1 to 4 minutes per dish, depending on the glass.
Wear safety glass and gloves.
- Place the dish on a folded towel in the dish pan. There should be enough cold water in the bin to slightly submerge the dish.
- Put on your fancy safety glasses and gloves.
- Start drilling on medium speed, holding the drill at a 45-degree angle to the plate to get started.
- Hold the drill steady but do not press too firmly against the glass. The diamond drill bit will do the work. You want consistent speed, not force.
- After about ten seconds, slowly move the drill (while you’re drilling) to a 90-degree angle, directly over the hole.
- As you drill it will look like little clouds of smoke are moving in the water around the hole. That’s the tiny bits of glass being drilled away.
- Usually after a minute or two, the drill bit will suddenly plunge through the plate when the hole is done (be prepared). Having the towel under the dish helps ease this part.
Tips For Drilling Metal Plates & Cutlery
- Thin metal serving dishes typically drill quite easily using a metal (titanium) drill bit.
- Metal cutlery (forks, spoons) can really vary for ease of drilling. You just have to try and see if it works. I have luck with about half of what I try. The rest are mightier than me!
- Always use proper safety gear including work gloves and glasses.
How to Assemble Dish Flowers

Flower
- Working on a clean, flat surface, work from back to front, lining up the drilled holes as you go. Place some silicone sealant wherever the plates will be touching each other to keep the pieces from rubbing too tightly together.
- Allow the sealant to dry (usually takes 3 hours).
- If you drilled holes, thread a nut onto a 10″ piece of wire and fold the wire in half. Pinch the wire together to hold the nut in place and thread the wire through a washer. Thread everything through the front of the dishes. The nut and washer keep the wire from slipping through the flower. Alternately you could use a two-hole metal button at the center of your flower to hold the wire in place.
Stem

- Drill a pilot hole and then a 5/16″ hole through the wooden stem. (Drilling the pilot hole first keeps the wood from splitting.)
- Use forks and spoons as leaves, attaching them with small wood screws.
- Hammer post into ground.
Mount the Flower on the Stem
- Attach flower by threading wire through hole in wooden stem and secure at back.
Alternate Way to Mount the Flower
- You can also attach a copper pipe end cap to the back of the flower (using the same silicone sealant as adhesive). Allow to dry and insert matching copper pipe as a stem.
Resources
Empress of Dirt
FREE TIP SHEET
DIY Garden Art Dish Flowers
Includes the materials list and basic instructions from this article.
The download link will be sent to your email.
Joining our free newsletter list is optional at checkout.
This project is included in this ebook:
Ebook

25 Garden Art Projects & Ideas
by Melissa J. Will
Grab the top garden art DIY projects and tips from Empress of Dirt
About This Ebook | Visit Ebook Shop
This ebook is a digital file (PDF format) you save to your device. It is not a physical product.
PayPal, Credit Card, Apple Pay
~Melissa the Empress of Dirt ♛