Learn how to paint strawberries on rocks with this beginner tutorial. Some say they deter birds, but either way, it’s a fun garden craft to try with kids.
If you are new to stone painting, also see our starter guide: Stone Painting for Beginners.

DIY Strawberry Rocks for the Garden

These little strawberries are a good beginner craft paint project.
The tutorial shows you everything you need to turn small rocks or stones into charming, hand painted strawberries.
While they can be decorative, this is also a popular project to make with children. I’ve seen them used for homeschoolers for counting and math games as well as play food. I have mine as a colorful decoration in my little greenhouse.
Do Strawberry Rocks Deter Birds?

You may have seen tips suggesting painted strawberries act as a good deterrent for keeping birds away from strawberry crops. The idea is that the bird pecks the stone and determines that the crop is not edible and decides to find food elsewhere.
But would this work ongoing? Without studies to reference, we’re left to anecdotes and basic logic.
Personally, I’m skeptical. I’m not sure how you could ensure they peck the rocks and not the real fruit, or if this would actually be a deterrent.
Strawberries ripen at different rates and birds know this. What’s not ripe today, may be ripe tomorrow.
Plus, there are lots of other animals that eat berries—a bird might give up but the mice and squirrels aren’t going to mistakenly peck stones!
But if you try it and it works, great!
Tips for Making Strawberry Stones
Supplies
- Stones | Use plain rocks and stones not polished stones because the paint won’t adhere nicely.
Choose similar sizes and shapes. Wash and dry thoroughly before painting. - Patio Paints (acrylic craft paints) | I used red, orange, black, light green, and dark green.
- Paint Brushes | Artist brushes for acrylics in various sizes
- Pencil
- White Latex primer or Acrylic Gesso | I use the type of primer made for wall painting. A base coat like this helps the strawberry paint colors (red and green) look crisp and bright.
- Paint pens or Fineliner pens for outlining details
- Acrylic varnish with UV protection (glossy or matte, liquid or spray form), polyurethane, or varathane.
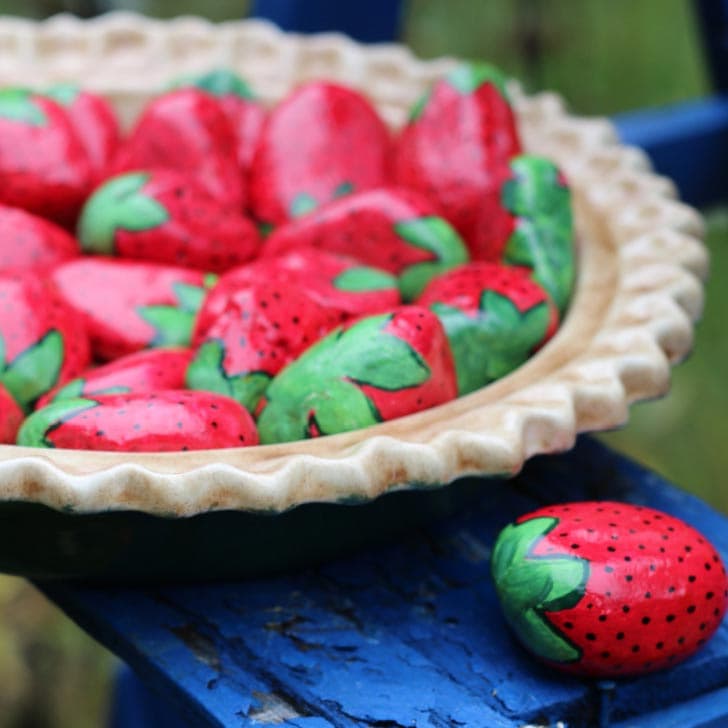
- Pie Plate that looks like pie crust (Optional) | I found mine at a local thrift store. I also see them on Etsy. Try this search for “pie plates that look like pies.”

Steps


Use a photo of strawberries for reference. Beginners can paint following the steps shown here. More advanced painters may want to try more realistic depictions.
Each strawberry has green leaves at the top, red fruit, black dots to represent the seeds (which are technically actually fruits), and black to outline the leaves.

More Stone Painting Projects
- How to Paint Owl
- How to Paint Birds on Stones
- Garden Stone Craft Projects
- Hand-Painting Garden Stones (Animals and Flowers)
Primer
First apply primer to clean, dry stones. If you have an old baking cooling rack (dedicated to crafting), you can paint one side, allow a few minutes for it to dry, then turn the stone over on the rack and paint the other side. Allow everything to dry the amount of time listed on your primer product label.
A blow dryer is useful for speeding up drying times.
For best results, allow each layer of paint to dry thoroughly before applying additional layers.
Pencil
Sketch leaf shapes on your primed stones.


Paint
Fill in the berry area with red paint. I used a combination of red, with dabs of orange and black to get richer colors.
Paint the leaf sections using two colors of green. You can paint an entire leaf with one shade of green and use the other for highlights in select sections.
If the primer still shows through, apply another layer of paint after the first layers have dried.

Details
Use paint pens to draw seeds (black dots) on red areas of strawberries.
Also, outline leaves with black pen (if desired).
Protection
Allow everything to cure (dry thoroughly), then protect with polyurethane or other protective product that is bird safe (if you’re going to try to deter birds with them).
Many thin layers, with adequate drying time between each layer, work best.
Resources
Ebook

25 Garden Art Projects & Ideas
by Melissa J. Will
Reader’s favorite garden DIY projects and ideas from the Empress of Dirt website.
PayPal, Credit Card, Apple Pay
This ebook is a digital file (PDF format) you save to your device. It is not a physical product.
~Melissa the Empress of Dirt ♛

How to Paint Strawberry Rocks
Supplies & Materials
- 10 Rocks similar shapes and sizes
Instructions
- Wash and dry rocks.
- Apply 1-2 coats of primer or gesso. Allow to dry thoroughly between coats.
- With pencil, draw outline of leaves.
- Paint berry area using mixture of red and small amounts of orange, and black paint. Allow paint to dry thoroughly between coats.
- Paint leaves with medium dark green paint. Allow to dry and highlight with lighter green paint.
- When paint is dry, outline leaves with black or dark green paint pen.
- Draw series of dots all over red berry for seeds.
- Coat everything with a few layers of varathane or polyurethane, allowing to dry thoroughly between coats.
Diyanna says
adorable! I’ll be sharing it and linking to your website via my fb page 🥰
Melissa J. Will says
Glad you like them and thanks!
Molly Stingley says
so this would be great but for it to look like a pie we need to know how you make the pie crust dish or where to buy it.
Melissa J. Will says
I found the pie plate at a local thrift shop. I also see them on Etsy. Try searching “pie plates that looks like pie crust.” Here’s a link: https://www.awin1.com/cread.php?awinmid=6939&awinaffid=194813&platform=dl&ued=https%3A%2F%2Fwww.etsy.com%2Flisting%2F1423749374%2Fcovered-cherry-pie-plate%3Fga_order%3Dmost_relevant%26ga_search_type%3Dall%26ga_view_type%3Dgallery%26ga_search_query%3Dpie%2Bplate%2Bthat%2Blooks%2Blike%2Bpie%2Bcrust%26ref%3Dsr_gallery-1-22%26frs%3D1%26cns%3D1%26organic_search_click%3D1
Emily DeVita says
Where did you get the pie crust?
Melissa J. Will says
Hi Emily, I found the pie crust pie dish at a thrift shop. I also see them on Etsy and Ebay. Search “ceramic pie plate that looks like a pie.”
judy says
Adorable!