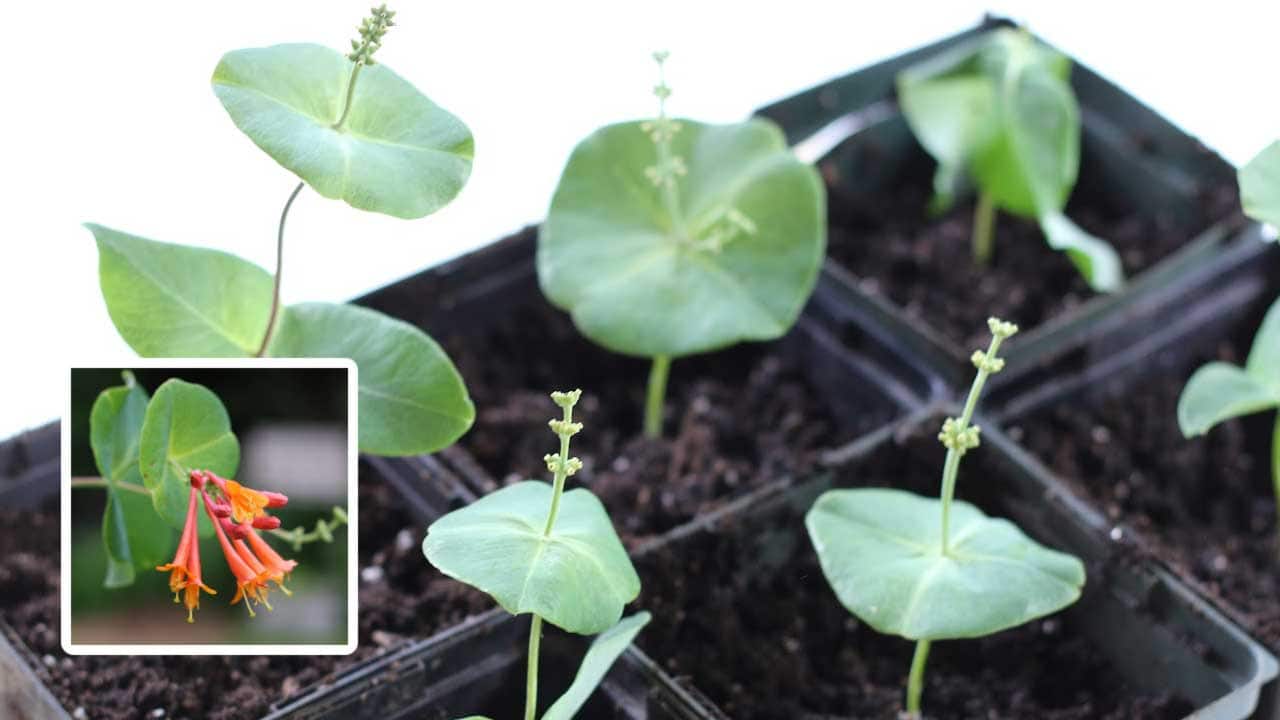
This is a basic method for taking cuttings from honeysuckle vines to root them for new plants. The best time for propagation is while the plant is actively growing but not yet flowering.
Here in North America, some honeysuckle vines including Lonicera japonica are invasive, so be sure whatever you grow is considered appropriate for your region. For more methods also see How to grow plants from seeds and cuttings.
Growing Honeysuckle from Cuttings

Ready to propagate honeysuckle cuttings?
This method shows propagation of a honeysuckle cutting but the same softwood cutting method can be used for numerous vining plants listed here.
You can also propagate honeysuckle from “hardwood” cuttings taken later in the growing season.
Get the Free Printable
There’s a free printable with this article.
Go to Resources (below) to get yours.
Before You Start

Before you start propagating honeysuckle, there are a few things to know.
Can You Start Honeysuckle in Water?
I’ve never had success with it which is why I recommend starting the cuttings in potting mix as shown below.
But, if you want to try it, start with young stems that have leaves but are not flowering, not tougher hardwood stems. Remove lower leaves and keep node area (where leaves were growing from stem) submerged. Change water every few days.
Native Versus Invasive Species
Before you grow honeysuckle (Lonicera spp.), be sure to choose a non-invasive species for your area. Invasive species can cause incredible, irreversible damage to our eco-systems.
Native Honeysuckles (parts of Canada / US)
- Fly Honeysuckle Lonicera Canadaensis
- Goldflame Honeysuckle L. heckrotti
- Native or Northern Bush honeysuckles Diervilla lonicera
- Swamp Fly Honeysuckle L. oblongifolia
- Trumpet honeysuckle L. sempervirens
- Brown’s honeysuckle L. x brownii (hybrid)
Invasive or Aggressive
- Lonicera tatarica
- Lonicera maackii
- Lonicera morrowii
- Lonicera xbella
- Lonicera xylosteum
- Lonicera japonica
Success Rate
Some cuttings root, others do not.
You might have all the conditions right but it’s not time for that particular plant.
Just keep trying and try lots.
I have batches where they all root and others where they all shrivel up and die.
But I keep trying because eventually some grow into lovely new plants.
For Best Results
- Take your cuttings in late spring or early summer for this softwood cutting method (shown below).
- Use healthy, new growth from an existing vine (2+ years old).
- Do not use a stem that is flowering. Better still, take cuttings before the vine is flowering.
- Early mornings are best for taking cuttings to ensure the vine is full of sap (and the cuttings won’t dry out too quickly).
- Cuttings will fail if they dry out so stay on top on your watering without over-doing it.
About Plant Patents
Some plants are patented and asexual reproduction is not permitted without permission from the patent holder. Patents and trademarks are usually listed on plant tags.
Steps
1Gather Your Supplies

Read all of the instructions first and then get your supplies ready so you can get the cuttings planted within minutes after removing them from the parent vine.
Soil Propagation Method
It is also possible to simply take a cutting (right below some leaves), place it in moist soil and get a good, rooted cutting in a few weeks.
These tips (below) may help if you feel you need more guidance.
You’ll need:
- Potting mix + water
- Small flower pots (3-4″ wide) – one per cutting
- Clean, fine, sharp knife or cutters. My favorite is a scalpel.
- Clear plastic bags (to form greenhouse over pots unless your humidity is good / over 50%)

- Rooting hormone
- Plant tags (noting date propagated and source plant) – I use Popsicle sticks + pen
- Bamboo skewers (optional)
Fill each pot with moistened potting mix and press into place to get rid of any air pockets.

2Take Your Cuttings

- For each new vine take a 6-8″ cutting from an existing vine (at least two years old). Make a slanted cut and be careful not to crush the stem when cutting.
- Remove any flowers.
- Clip the cutting with a clean, sharp knife right below a leaf node (the part of the stem where leaves grow) – shown as A in image below.
- Next, remove two sets of lower leaves – shown as B in image above.

3Remove Some Skin from Base (Optional)

This next step is probably not essential but I was taught to do it years ago and have carried on the tradition.
Only do this if you’re really steady with your hands.
- Scrape away a very fine outer layer of the stem. Do this on the bottom 2″ of stem, from the base to the next leaf node.

4Dip Stem in Rooting Hormone

- Put a small of amount of rooting hormone in a clean dish.
- Dip the bottom 2″ of the stem in the rooting hormone. Tap away excess.
- When done, discard leftover rooting hormone.
- Use a skewer to form a hole in the potting soil and insert the stem 2″ deep (or to the second leaf node).

5 Add Plastic Bags (Optional)
You only need to create mini greenhouses over the pots if your air is dry and there is a risk that your cuttings might dry out. If your conditions are humid (50% and up), skip this step.
It’s a dance between keeping them moist but not letting them get moldy by providing adequate air flow.
If you do want to use bags:
- Use a bamboo skewer (or something similar) in each pot to hold the upside-down plastic bags.

- Place a plastic bag over each pot. Position them so they are not touching the plant if possible.

Air flow is also important so either keep the bottoms open or open the bags each day for ventilation.
If you find the bags get a lot of condensation, keep them off.

6Keep Soil Moist
- Place in indirect sun with air temperature around 70°F (21°C) if possible..
- Make sure soil remains moist but not damp or dry. There should be some but not excessive condensation on the inside of the bags. I know it’s hard to judge if you’re new to this. When in doubt, keep the bags off.
- Never let the soil dry out!
- Roots should form within 2-3 weeks. Be really careful when you check: just tug slightly on a stem to see if it’s grabbing the soil.
- When new roots are at least 1″ long, your new plants are ready to be placed in larger pots or planted outdoors.
Resources
Empress of Dirt
FREE TIP SHEET
Seasonal Plant Cuttings Calendar
Includes plant lists from this article.

The download link will be sent to your email.
Joining our free newsletter list is optional at checkout.
- There are lots more tutorials for propagating plants here.
~Melissa the Empress of Dirt ♛

How to Grow Honeysuckle Vine From Cuttings
Equipment
- Bamboo skewers
- Plastic food bag
Supplies & Materials
- 1 Honeysuckle vine before flowering
Instructions
- Clean snippers with rubbing alcohol.
- Take an 8-inch cutting by snipping below a leaf node.
- Pinch off lower leaves from lower 4-inches of stem.
- Use scalpel to slice outer skin off bottom 2-inches of stem.
- Dip lower 2-inches of stem in rooting hormone powder and tap off excess.
- Place stem in potting mix, burying lower 2-inches and secure in place.
- Water thoroughly and continue watering as needed.
- Use bamboo skewer as tent pole to hold plastic bag over plant to retain humidity (optional).
- Place in warm spot with indirect sun (70°F / 21°C).
- When roots are 1-3 inches long, transplant to garden.