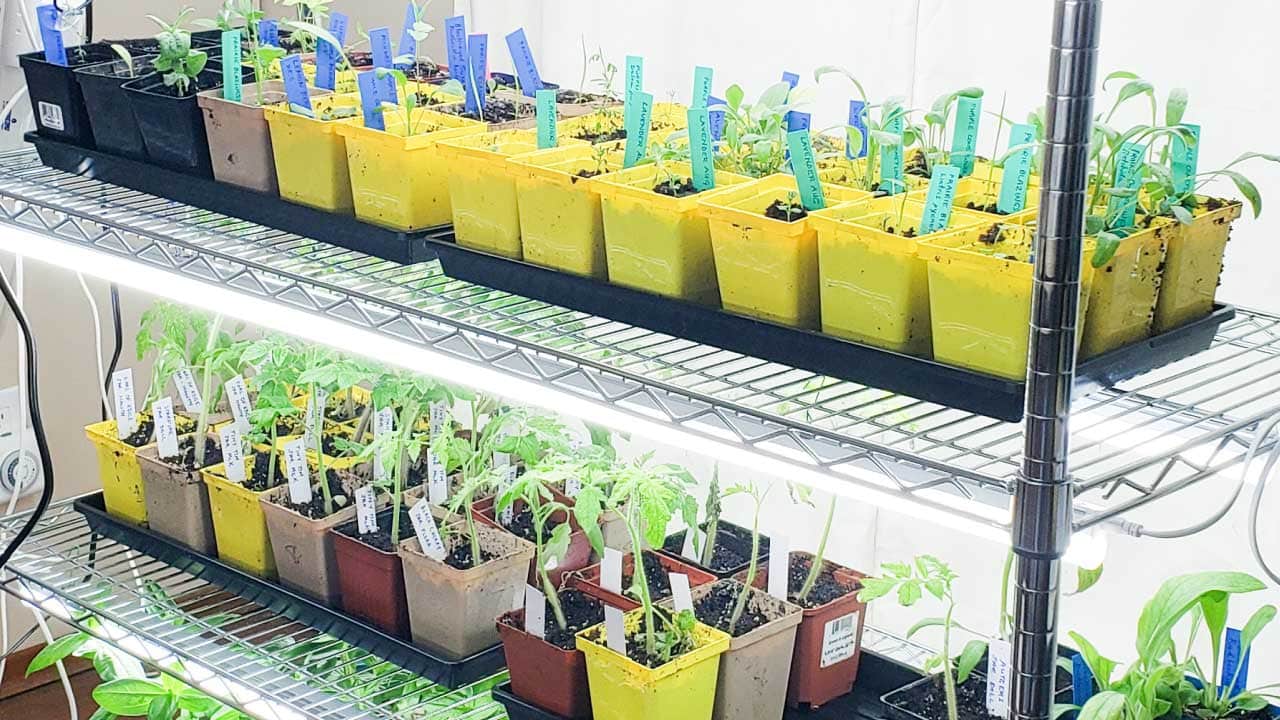
This is the low-budget setup I use to start hundreds of plants from seed indoors each year, using simple LED or fluorescent lights to raise strong, reliable seedlings.
This is part of a series, Indoor Seed Starting for Beginners | Sow Indoors Grow Outdoors, where I walk you through the indoor sowing process from seed to garden. It’s all the information I wish I had when I was getting started.
Best Low-Cost Indoor Seed Starting Supplies

I have been starting plants from seeds indoors at home for years. Here I show my favorite cheap (low-cost) supplies for a simple setup perfect for germinating seeds and growing young plants.
If you want step-by-step instructions on how to grow seedlings indoors, my ebook, Seed Starting for Beginners: Sow Inside Grow Outside is packed with all my best tips.
If you are on a budget, also have a look at my thrifty shopping tips for finding what you need for a song.
Contents
- Lights
- Shelves
- Hanging Hardware
- Trays & Accessories
- Seeds
- Seed Starting Mix
- Soil Blocking Tool
- Trays & Containers
- Plant Tags & Labels
- Electrical Timer
- Watering Can
- Seedling Heating Mat
- Fertilizers
- Cleaning Supplies
- Electric Fan
- Risers
- Resources
Indoor Seed Starting Setup on a Budget

This is a selection from the ebook, Seed Starting for Beginners: Sow Inside Grow Outside, sharing everything you need to know to start your own garden plants from seeds indoors.
If you would like the entire ebook with all the printable lists in one handy file, you can save it instantly here.
Let’s have a look at the supplies used to start seeds indoors at home. I grow hundreds of plants from seed each year using this basic setup.
If you want a list, there is a free downloadable checklist in the Resources section.
1Lights
Are grow lights necessary?
In my experience, if you have sunny, draft-free windows with adequate space, you can get by without grow lights, but grow lights are preferable. By “grow lights” we simply mean lights used to grow plants.
Lights like the ones suggested here can be put on timers to deliver consistent light for whatever time periods you need. That’s something that is not always possible with the sun, particularly during the winter months.
There are lots of fancy grow light systems on the market, but there really is no need to spend that kind of money. Plus, light choices can get really confusing really fast. I have kept these tips as simple as possible so you can get started right away.
I started out using standard fluorescent light units commonly used in basements and workshops and they have worked nicely for decades.
As the fluorescent lights gradually wear out, I have been switching to LED lights like these ones.

Both types of lights work just fine. My seedlings grow beautifully indoors, and transition just fine to life outdoors.
If you’re on a budget, choose whatever you can get for the best deal. If it’s a toss up, I would choose the newer LED ones because they are lightweight, more aesthetically pleasing (to me), use less power, and can be linked together in groups.
LED Grow Lights
Recommended LED Lights
Seedlings | Barrina Super Bright White LED Lights | Amazon
These lights work nicely for indoor seed starting and growing young plants until it’s time for outdoor transplanting.
Indoor Flowering & Fruiting | Barrina Full-Spectrum LED Lights | Amazon
If you need lights for long-term growing including plants that can flower and fruit indoors, choose full-spectrum bulbs. You can also use these for seed starting.
Fluorescent Lights

Basic fluorescent light units come in 24-inch, 36-inch, and 48-inch lengths. If you are going to suspend the lights from shelves (see below), choose units that match the length of your shelves, and get two units per shelf.
Fluorescent light fixture | I use light fixtures that use T8 and T5 fluorescent bulbs. Find some ‘warm’ and ‘cold’ bulbs if you can. Also, be sure to get the units designed hang from the ceiling, not the type that are hardwired into the ceiling, so you can hang them from your shelves.
2Shelves


My ideal setup is a shelving unit on wheels with two fluorescent or LED lights suspended on the underside of each shelf.
You could also use wall-mounted shelves if they are strong enough to hold the weight of plants and lights.
A distance of at least 14-inches between shelves is desirable—adjustable shelves with a wide range of options is even better. You need room for the lights and for the plants to grow—and don’t forget to include the height of your pots as well.
The longer you intend to keep them under the lights, the more room (height) you’ll need. Plus, some species grow much taller than others, of course.
I mention wheels, because it’s super handy to be able to move the entire unit around to access the seedlings for watering.
- Wire shelving unit | If these wire shelving units had adjustable shelves, they would be perfect. Be sure to check yard sales and thrift shops or place a wanted ad for stuff like this.
3Hanging Hardware
The LED lights I recommend have small openings you can thread with wire or bent paperclips for easy hanging.
Fluorescent light fixtures can vary a lot in design, depending on the manufacturer. I find fluorescent tubes are prone to coming loose, so I wrap a cable tie around the entire light unit to prevent the bulbs from slipping out.
When it’s time to hang your lights, you’ll need a setup that allows you to adjust the height as your seedlings grow. Aim to keep the lights 2 to 3 inches above the tops of the plants.
Pulley hangers are a simple way to adjust the lights up or down. Metal S-hooks are also handy—some fixtures include chains and S-hooks, while others may need you to add them.
Another option is to raise your plant trays instead of moving the lights. I save cardboard drink cup holders from takeout—they’re easy to stack and let you set the trays at just the right height.
4Drip Trays & Accessories
Here are some things to consider.
- Waterproof tarp | I don’t find seed starting particularly messy (once the seeds are sown), but, it’s good to have your floors protected in case some water or soil spills. Choose a tarp larger than the base of your shelves. I double mine over for extra peace of mind.
- Plastic boot trays | I use boot trays on each of my shelves to hold the seed trays and catch water spills. If you can find the style with raised edges, that help hold water, even better! These can be hard to find though. I like them because they catch drips and you can water your seedlings from below by filling the trays.
Alternate options to line the shelves and prevent spills:
- Seedling trays from a garden nursery: choose the type that are watertight, not the ones with drainage holes.
- Lids from large plastic storage tubs can also work.
- Old baking sheets with deep sides are good drip catchers too.
5Seeds
For perennials, I look for local, organically-grown seeds first.
For annuals including vegetables, these are some of my favorite mail order sources:
Mail Order Seeds
- SeedsNow (US Shop & Shipping)
- High Mowing Organic Seeds (US Shop & Shipping)
- West Coast Seeds (Canadian Shop | US & CAD Shipping)
If you want to check if seeds are viable prior to sowing in soil, use this seed viability test.

6Seed Starting Mix
We say seed sowing ‘mix’ or ‘medium’ because the right stuff to use indoors does not contain soil. Indoor seed sowing is a different beast.
Away from the natural checks and balances of the outdoors, we want to create a clean sowing environment with as few pathogens as possible.
- Seed Starting Mix (Soil-less) works very nicely for seed sowing. I also use organic potting mix. Read the ingredients to be sure the product is free of any unwanted additives such as synthetic water pellets or synthetic fertilizers (if you avoid them like I do). The stuff I buy is organic.
You can also make your own seed sowing mix (more on this below). I do this if the ready-made stuff is more expensive than the cost of the individual ingredients for the same total volume.
You can read more about the difference between organic and synthetic fertilizers here.
When your seedlings are a couple of inches tall, if there’s still a few weeks before last frost, you should move them to 3-inch pots (or larger if you have room) with organic potting soil for containers.

7Soil Blocker Tool (Optional)

This is my favorite seed starting tool although you can start seeds just fine without one. It is used to form solid little blocks of seed starting mix.
Seeds are sown in the blocks made from water-moistened potting mix. The tool compresses the potting mix so it forms firm soil “blocks.”
Once seeds have sprouted, these soil blocks are super simple to move around and/or transplant.
There is a demonstration video here that I recorded several years ago.
- Soil blocking tool | I use the size that makes four 2-inch blocks for all my seed starting. This size fits perfectly in many seedling trays. Flower growers like the mini 3/4-inch blocks to start hundreds of seeds on each tray.
- Single soil blocking tool | I haven’t tried this one but it’s a less expensive option.
Another good feature is, you can prepare trays of soil blocks ahead of time and simply re-dampen them at seed sowing time.
Soil Blocking Tool Set
If you love the soil blocking system, you might want the complete set. As your seedlings grow, you move them into the next size block. It’s very handy!
This Soil Blocker Set at Amazon comes with 3 sizes.
The smallest size block fits within the mid-size block. The mid-size block fits into the large block.
- The 3/4-inch mini blocker tool for starting seeds.
- The mid-size 2-inch tool.
- The large size 4-inch tool.
I have the 2-inch tool, which works fine on its own, but would love to have the whole set.
You will not need this tool if you want to use open trays or small, plastic pots instead.
8Trays & Containers
What you need will depend on how you want to do this. There’s no right or wrong way. Often it comes down to what supplies you have or can easily obtain.
I start my seeds in seedling trays (obtained free from garden nurseries when buying plants) and use soil blocks, as mentioned above. Sowing directly into trays or pots is fine too. Whichever way you go, ensure there is drainage.
- Seed starting trays | Get tray sizes that works with the size of your pots or soil blocks, and the size of your shelves.
You want to fit as many plants as you can under the lights without wasted space.
New seedlings are tiny, of course, but as your plants mature, they will grow taller and wider, need repotting, and take up more root space.
These trays are very handy for holding a group of pots and protecting your shelves and floors from drips.
You can sometimes get them free when purchasing nursery plants.
If you want to buy new ones, these ones from Bootstrap Farmer are nice and strong and will last for years.
- Plastic garden pots | I save plastic pots from garden nursery purchases and our local garden recycling depot.
With the soil blocking method, I first start the seedlings in soil blocks without pots.
Once they are a few inches tall, I plant the soil blocks with the seedlings into small pots (2.75 to 4-inches wide, depending on how big the seedling is and what I have on hand).
It is ideal if the pots are square and fit nicely in the seedling trays, to make maximum use of the available light.
As the plants grow, I add more lights so every seedling has overhead light.
As mentioned, you could sow directly into pots.
In this case, figure out how many pots (of what size) fit nicely with your trays/shelf and light size.
In some cases, you won’t need to transplant to bigger pots before planting outdoors, in other cases, you will.
It all depends on the plants, how big they get, and when your last frost date is. Around last frost, we start “hardening off” seedlings to gradually transition them to life outdoors.

9Plant Tags or Labels
It’s really important to keep track of your seedlings so you know what’s what. There are a few options.
Easy Homemade Tags
If you want to make plant tags or labels for your seedlings, this lists all the best (cheap and easy) options for making tags.
The most popular options are HB 2 pencil, pen, or a water-proof fine-tip pen on plastic or vinyl tags. You can buy tags or make them from cut-up (lead-free) window blinds.
Label Your Seedling Tray

With my tray method, I actually mark the tray instead of using tags for the seeds and seedlings. You can see my grid labeling method here.
Basically, I mark the tray like the cells in a spreadsheet (rows and columns) and track everything that way.
I also like this approach because plant tags (when placed vertically) don’t always fit nicely under the grow lights so marking the trays is a good workaround.
Once seedlings are in pots, I use plastic plant tags and a paint pen or waterproof labels.
For reusing tags, to save money and avoid creating plastic waste, use these instructions for removing marking pen from surfaces like plastic.
Tip: Write Your Tags First
Write your tags before you sow, this way they are ready to go.
10Electrical Timer

It’s important to have your grow lights on for a set amount of time every day.
Because mine are in our living area, I like them to do double-duty, so I put them on in the evenings when we can also make use of the light.
I use a basic 24-hour mechanical timer to turn them on and off. I run them for approximately 12 hours at a time. I’ve tried numerous digital timers and none of them kept good time! But the electrical, mechanical ones are inexpensive and work fine.
Some gardeners find they need lights running approximately 14 to 16 hours a day. I found this to be too much, probably because my plants are also getting some sunlight during the day.
If your home is dark, give them 14 hours a day and see how it goes. No two growing spaces are the same so you need to experiment and figure out what’s best for your setup.
You might also like a digital thermometer with a hygrometer to keep track of indoor temperatures and humidity levels.
11Watering Can

It is best to water the soil / growing medium, not the actual plants. The soil blocks make it easy to water ‘from below’ because you can water the tray they are sitting in and let the roots soak up the water.
- Watering can | Look for a watering can with a long, skinny neck. You need to be able to get to your plant roots without a bulky watering can knocking into the grow lights.
12Seedling Heat Mat (Optional)

Every plant species has a temperature sweet spot for germination. We’ve been told all seeds like plenty of heat but it’s just not true. But, realistically, we’re not going to provide an individual temperature for each seed we’re starting so instead it’s good to work with a basic range that suits many types of seeds.
For most seeds, a soil temperature in the range of 65-75° F (18-23° C) will allow germination.
This has a list of best soil temperatures for vegetables seeds and flower & herb seeds here.
This guide explains how and when to use heat mats for indoor seed starting. Contrary to popular advice, they are not always helpful or the small benefits do not justify the time and cost.
Also, I came up with this list of suggestions for other ways to warm your seedlings, making use of existing heat in your house, which may also help.
Overall, a draft-free room in the temperature range mentioned with adequate light is all you need.

13Fertilizers
Seeds contain all the nutrition and energy needed to support germination. Then, as a seedling grows, it relies on its environment for sustenance.
Needs vary by plant type, but, you may want to add fertilizer. You have the option of synthetic or organic fertilizers. I use organic ones in low doses as needed.
For synthetic fertilizers, check the instructions on the label and reduce the dose by half (or more) since your seedlings will be little guys and too much is not beneficial and can be harmful.
I have not tested these specific products, but they will give you an idea of what’s available.
Granular fertilizers are much more economical than liquid ones since you are paying to ship a lot of water.
14Cleaning Supplies
Before using any new or repurposed garden pots, trays, tags, or containers, you need to wash and sanitize them.
I wash mine in a tub of mild dish soap, rinse thoroughly, and then soak in a bleach solution.
Rinse thoroughly and allow to dry before use.
- Dish soap
- Household bleach
Disinfecting With Bleach (Sodium Hypochlorite)

The Center for Disease Control (CDC) recommends:
Soak or spray any hard (non-porous) items for at least one minute in a bleach solution using household bleach (5 to 9% sodium hypochlorite) and room temperature water.
- 1 teaspoon (5 ml) of bleach per 1 cup (250 ml) of water or
- 4 teaspoons (20 ml) of bleach per quart (950 ml) of water or
- 1/3 cup (80 ml) of bleach per 1 gallon (16 cups) of water
Follow all precautions on product including:
- Clean and dry items before disinfecting.
- Wear protective equipment including gloves and eye protection.
- Never mix bleach with ammonia or any other cleanser.
- Work in well-ventilated area.
Also note that bleach solutions will not be as effective after being mixed with water for over 24 hours. .
15Electric Fan
Once your seedlings have sprouted, an oscillating electric fan can help prevent or reduce problems with insects and other pests.
You can plug it into the timer or run it for shorter times. Choose longer times if you have houseplants prone to things like whiteflies.
If you’re growing on tall shelves, you might want a standing fan or one that clips on the shelf posts.
Fungus Gnats
If you notice tiny mosquito-like insects flying around your houseplant, it may be fungus gnats.
You can trap the adults using these sticky yellow cards which will in turn prevent females from laying eggs.
16Risers
Height Alert
If you grow a variety of seeds, you may find that your seedlings are growing at different rates and reach very different heights.
This will require some adjustments as you need to keep the grow lights just 2 to 3-inches above their heads.
Often it’s easier to raise up the pots or trays rather than adjusting the lights.
To accommodate different heights, as things grow, I group same-height seedlings together in smaller trays.
Where needed, I add stacks of fast food drink trays and scrap pieces of 2x4s (wood) under the trays to bring the shorter plants closer to the lights.
This will all depend on what you grow, so keep this in mind and have some supplies ready in case you need to do some height-shifting.
And that’s it!
Now it’s time to sow some seeds.
Grab the seed starting ebook to walk through the whole process.
17Garden Apron

Whether you buy one or make one, a garden apron is a must-have! I sew heavy duty ones for the messy garden work and keep a comfy cotton one for seed starting.
You can get my free pattern for sewing a garden apron here.
Resources
Empress of Dirt
FREE TIP SHEET
Low-Cost Seed Starting Supplies
File includes a checklist of recommended supplies for indoor seed starting.
The download link will be sent to your email.
Joining our free newsletter list is optional at checkout.
Recommended Books
Ebook

Seed Starting for Beginners
Sow Inside Grow Outside
by Melissa J. Will
Everything you need to get started with indoor seed starting for indoor and outdoor plants. Grow what you want—any time of year!
PayPal, Credit Card, Apple Pay
This ebook is a digital file (PDF format) you save to your device. It is not a physical product.
Ebook

Growing Vegetables
A Weekly Indoor & Outdoor Seed Sowing Plan for Beginners
by Melissa J. Will
Take the stress out of growing your own vegetables with this seed sowing plan. It organizes sowing into logical groups—starting indoors weeks before the last frost, plus direct sowing for spring and early summer.
PayPal, Credit Card, Apple Pay
This ebook is a digital file (PDF format) you save to your device. It is not a physical product.
Ebook

Empress of Dirt
Printable Garden Planner & Notes
An assortment of basic garden checklists, undated calendars, and note pages for planning and tracking your gardening season.
PayPal, Credit Card, Apple Pay
This is a digital file (PDF format) you save to your device to print at home. It is not a physical product.
~Melissa the Empress of Dirt ♛